Integrated Development Environment
Introduction
STRATO offers a complete Integrated Development Environment through a VSCode extension. You can find STRATO VSCode on the Microsoft VSCode Marketplace, or by searching for it from the extensions tab within VSCode.
Feature Overview
This extension allows for developers to easily interact with the STRATO platform directly through VSCode.
- Smart Contract Development Support:
- View deployed smart contracts.
- Easy debugger setup.
- Automatic code static analysis with warnings and errors.
- Automatic code fuzzing and tests for specified contracts.
- Project Management:
- Create a new project from an existing STRATO app framework.
- Deploy a project to a STRATO node.
- Run a project on a STRATO node.
- Test a project on a STRATO node.
- STRATO Node Information:
- Retrieve the information of a running STRATO node.
Setup
The extension must be provided with a config.yaml file to work with an existing STRATO deployment. This enables it to connect to STRATO to use its built-in features.
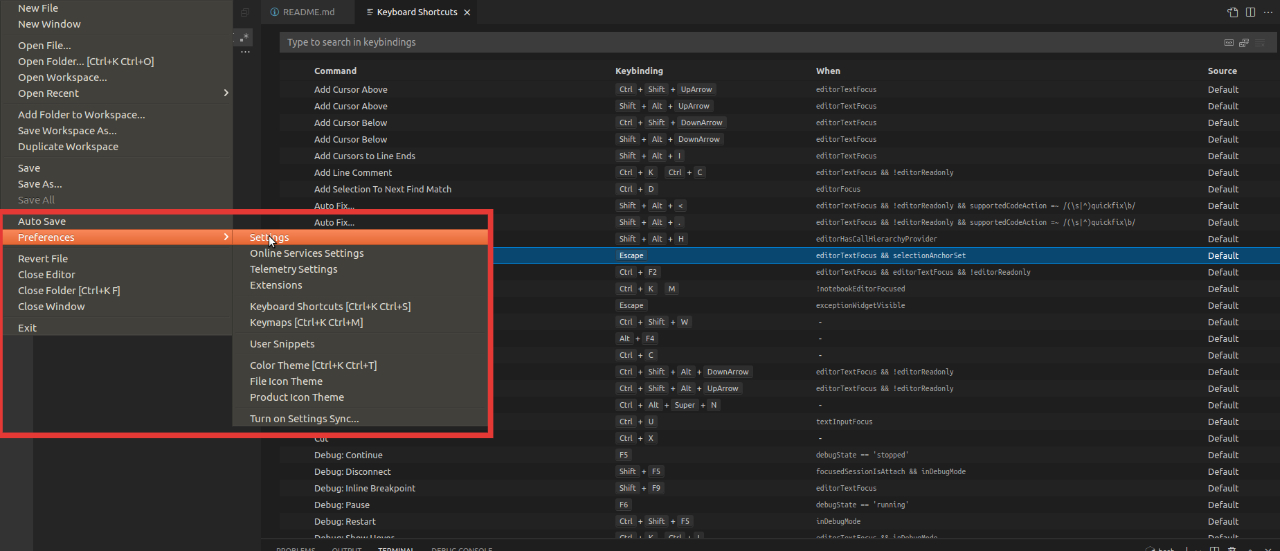
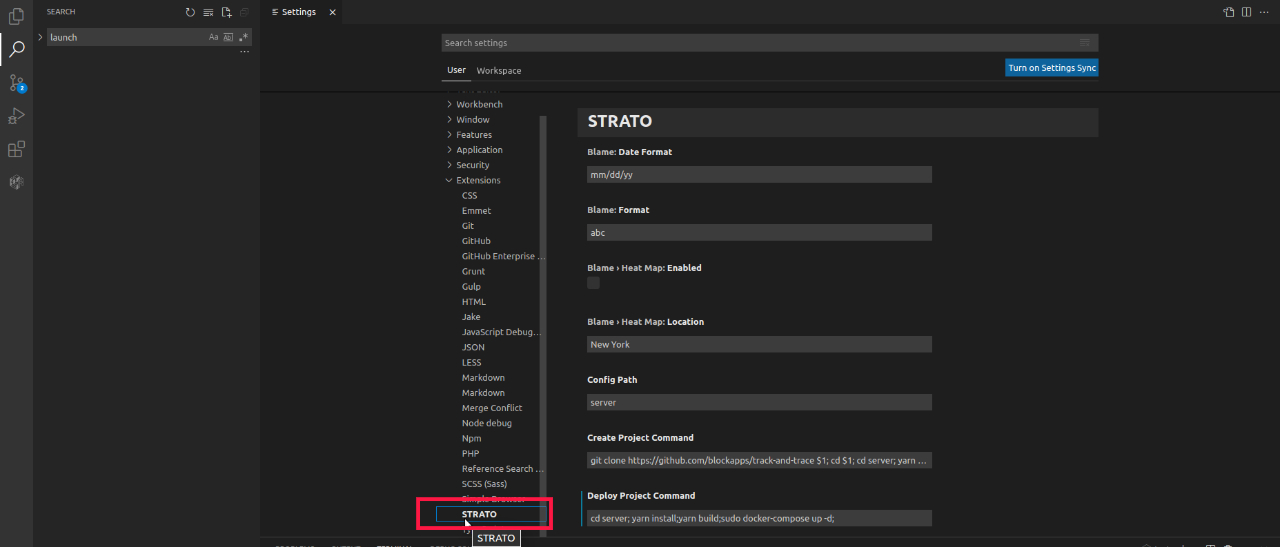
The path of the config.yaml file that the extension searches for can be modified by clicking File -> Preferences -> Settings and then navigating to Extensions -> STRATO. Once there, the path can be changed under Config Path.
The config.yaml should contain general information for the project and the information about each node(s) in the STRATO network that you wish to connect to:
apiDebug: false # Set to true for verbose API debug logs
restVersion: 8 # Version of blockapps-rest in project
timeout: 120000 # Timeout for requests
dappPath: ./dapp # Path to "dapp" folder for project (relative to server/)
libPath: blockapps-sol/dist # Path to solidity compiler for project
apiUrl: /api/v1 # URL of API endpoint for project
deployFilename: ./config/localhost.deploy.yaml # Deploy file path for project
dappContractName: "<NAME_OF_DAPP>" # Name

nodes:
  - id: 0
    label: "<NODE_LABEL>" # Label of this node within the network/application
    url: "<NODE_URL_WITH_PORT>" # https://localhost:8080
    publicKey: "<NODE_PUBLIC_KEY>" # Node's public key
    port: 30303
    oauth:
      appTokenCookieName: "<APP_TOKEN_COOKIE_NAME>" # Name of cookie to hold OAuth token
      scope: "email openid" # OAuth Scopes
      appTokenCookieMaxAge: 7776000000 # 90 days: 90 * 24 * 60 * 60 * 1000
      clientId: "<CLIENT_ID>" # OAuth Client ID
      clientSecret: "<CLIENT_SECRET>" # OAuth Client ID
      openIdDiscoveryUrl: "<OPEN_ID_DISCOVERY_URL>" # Open ID compliant discovery URL for OAuth
      redirectUri: "<AUTH_REDIRECT_URI>" # Authorization redirect URL for project
      logoutRedirectUri: "<LOGOUT_URI>" # Logout redirect URL for project
Note
Some configuration values are unique to the default project setup, so they may be changed if your project requires different values.
Once the config file has been completed and the filepath setup properly in the extension settings, it may be necessary to reload the VSCode extension for the changes to take effect.
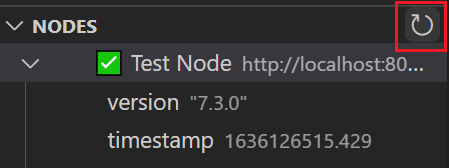
When the extension has been configured correctly, the name or URL of the connected nodes will display in the "Nodes" tab of the extension with a green check mark.
If any values within the config file have been changed, reload the sections of the extension panel with "refresh" button in the upper right corner of each tab.
Smart Contract Development
The following features are available to assist in smart contract development.
Requirements
- The STRATO node must be started with
vmDebug=true. - STRATO version 7.0 or greater.*
- Compatible VSCode version (>=1.62.1)
*Some features may require a later STRATO version as specified in that's feature's description.
Project Management
The following lists the project commands available to use in the extension.
Create Project
When a user clicks Create Project, a text box will appear at the top of the window asking the user to input the URL of the STRATO Test Node.
After that is entered, the user will be asked to input the URL of the STRATO Production Node. Following that, the user will be asked where they would like the cloned repository to be placed in their file system.
Once that is selected, the commands specified in the Settings of the extension will be run. These commands can be changed by the user following the steps in Customize Commands in Extension Settings.
Deploy Project
When a user clicks Deploy Project, the Dapp will be deployed to the local STRATO node. The commands run during this process are the ones specified in the Deploy Project Command specified in the Extension Settings. The commands can be changed by the user following the steps in Customize Commands in Extension Settings.
Once the deployment is complete, the Deployments section in the extension's sidebar will display a dropdown that shows information of the deployment.
Run Project
When a user clicks on Run Project, the steps to start the server for the Dapp will be executed following the Run Project Command specified in the Extension Settings. The commands can be changed by the user following the steps in Customize Commands in Extension Settings.
Test Project
When a user clicks Test Project, the test suite of the Dapp will be run using the commands specified in the Settings of the extension. The commands to run the test are specified in the Settings of the extension and can be changed following the steps in Customize Commands in Extension Settings.
Nodes
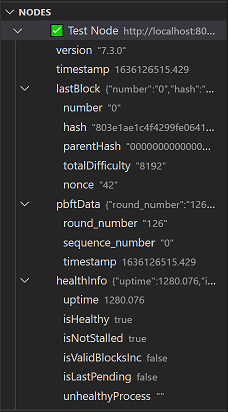
The extension allows developers to easily view running nodes' information with the Nodes tab of the extension panel. The extension will display information for each node listed in the config.yaml file. Hover over a field to view its full information.
The Nodes tab conveniently lists the following information:
- Connection Status
- Healthy: ✅
- Unhealthy: ⚠
- Disconnected: ❌
- Node Label
- The node label provided in
config.yaml. If no label is provided, the Node URL will be displayed.
- The node label provided in
- STRATO Version
- Last Block
- Number
- Hash
- Parent Hash
- Total Difficulty
- Nonce
- PBFT Data
- Round Number
- Sequence Number
- Timestamp
- Health Info
- Uptime
- Is-Healthy
- Is-Not-Stalled
- Is-Valid-Blocks-Inc
- Is-Last-Pending
- Unhealthy Process
- Warnings
- Warnings Active
- Messages
- System Info (Sizes shown in bytes)
- Memory Active
- Memory Free
- Memory Available
- Disk Usage
- Current Load
- File System Size
- File System Stats (Read, Execute)
- File System Stats (Write, Execute)
- Network Stats
Cirrus
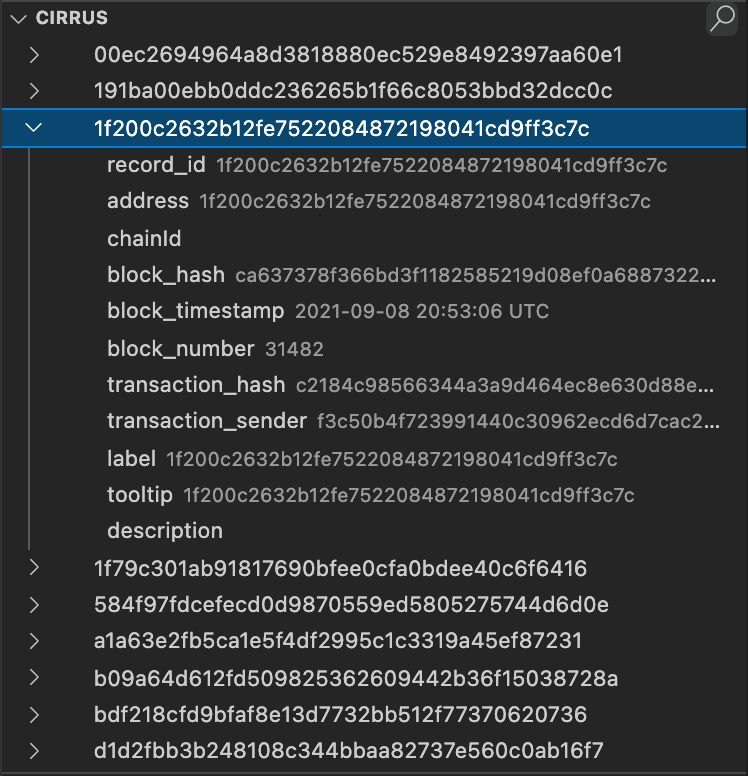
The Cirrus panel gives a bird's eye view of the instances of smart contracts currently deployed on STRATO. To populate the panel, click on the magnifying glass icon in the top-right corner of the panel. Clicking the icon displays a text entry box at the top of the window, which accepts a contract name followed by any valid Cirrus API query, e.g. SimpleStorage?storedData=gte.7. Upon pressing Enter, the IDE sends the query to the first node listed in the project's config.yaml file, and displays the results in the panel. Each entry in the panel represents one contract instance matching the filters given in the query. The text displayed for the entry is the smart contract address for that instance. Expanding an entry loads the contract's current state from Cirrus.
Contracts
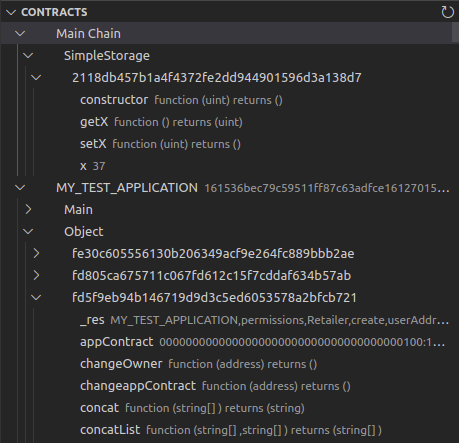
The Contracts panel shows the state of contracts deployed on STRATO. The panel is composed of several layers. The top layer is the list of nodes present in the project's config.yaml file. This allows developers to connect to and see the contracts/chains of multiple Nodes at once. This panel does not serve to provide detailed metadata about each node. Upon expanding a node entry, a list of chain IDs available on that STRATO node appears, including the Main Chain. Upon expanding a chain ID entry, a list of contract names deployed on that chain appears. Expanding the entry for a contract name shows a list of addresses for which that contract has been deployed on that chain. Finally, expanding the entry for a specific contract address gives the current state of the contract, as a list of key/value pairs. To update the contracts panel, click the refresh button in the top right corner of the panel.
Additionally, the Contracts panel allows for creating private chains, creating smart contracts, and calling existing smart contracts. Note that a Solidity file must be open and in focus within the text editor portion of the IDE to create a new private chain or contract. Otherwise, clicking on the icon to perform those actions will result in an error message requiring one be opened.
Uploading Contracts to Private Chains
To create a new smart contract on an existing chain, click on the plus sign icon to the right of one of the chain entries in the list. Note that this selects both the chain and the node on which to deploy the contract. Once a Solidity file has been opened, clicking the icon displays a series of text entry boxes, corresponding to each of the contract's constructor arguments. The first is a drop-down box containing a list of available contracts appears. The list of contracts is derived from the currently focused Solidity file, and includes all contracts within the file and contained in the file's imported files. Finally, a text box for each of the selected contract's constructor arguments will appear, allowing the contract to be instantiated correctly.
Calling Contract Functions
To call an existing smart contract, navigate to the contract's entry within the Contracts panel, and click on the play icon to the right of the desired function name. Clicking the icon displays a series of text entry boxes, corresponding to each of the function's arguments. After the function call is complete, a message box containing the result of the function call is displayed in the bottom-right corner of the text editor.
Creating Private Chains
To create a new private chain, click on the plus sign icon to the right of one of the nodes in the list. Once the desired Solidity file has been opened, clicking the icon displays a series of text entry boxes, corresponding to data points needed to create a private chain. The first box asks for the chain label, which is a non-unique, human-readable identifier for the chain. Next, a drop-down box containing a list of available contracts appears. The chosen contracts acts as the chain's governance contract. The list of contracts is derived from the currently focused Solidity file, and includes all contracts within the file and contained in the file's imported files. Finally, a text box for each of the selected contract's constructor arguments will appear, allowing the governance contract to be instantiated correctly.
Debugger
The SolidVM Smart Contract Debugger allows easy setup of a debugging environment in VSCode. This will enable developers to step through smart contracts code, view variables' values, and more. Contracts tested using the debugger are not posted as actual contracts to the STRATO blockchain. Instead, their execution is done in a completely isolated environment. The following sequence presents the functionality of the debugger in a step-by-step manner.
Requirements:
- STRATO version 7.0 or greater.
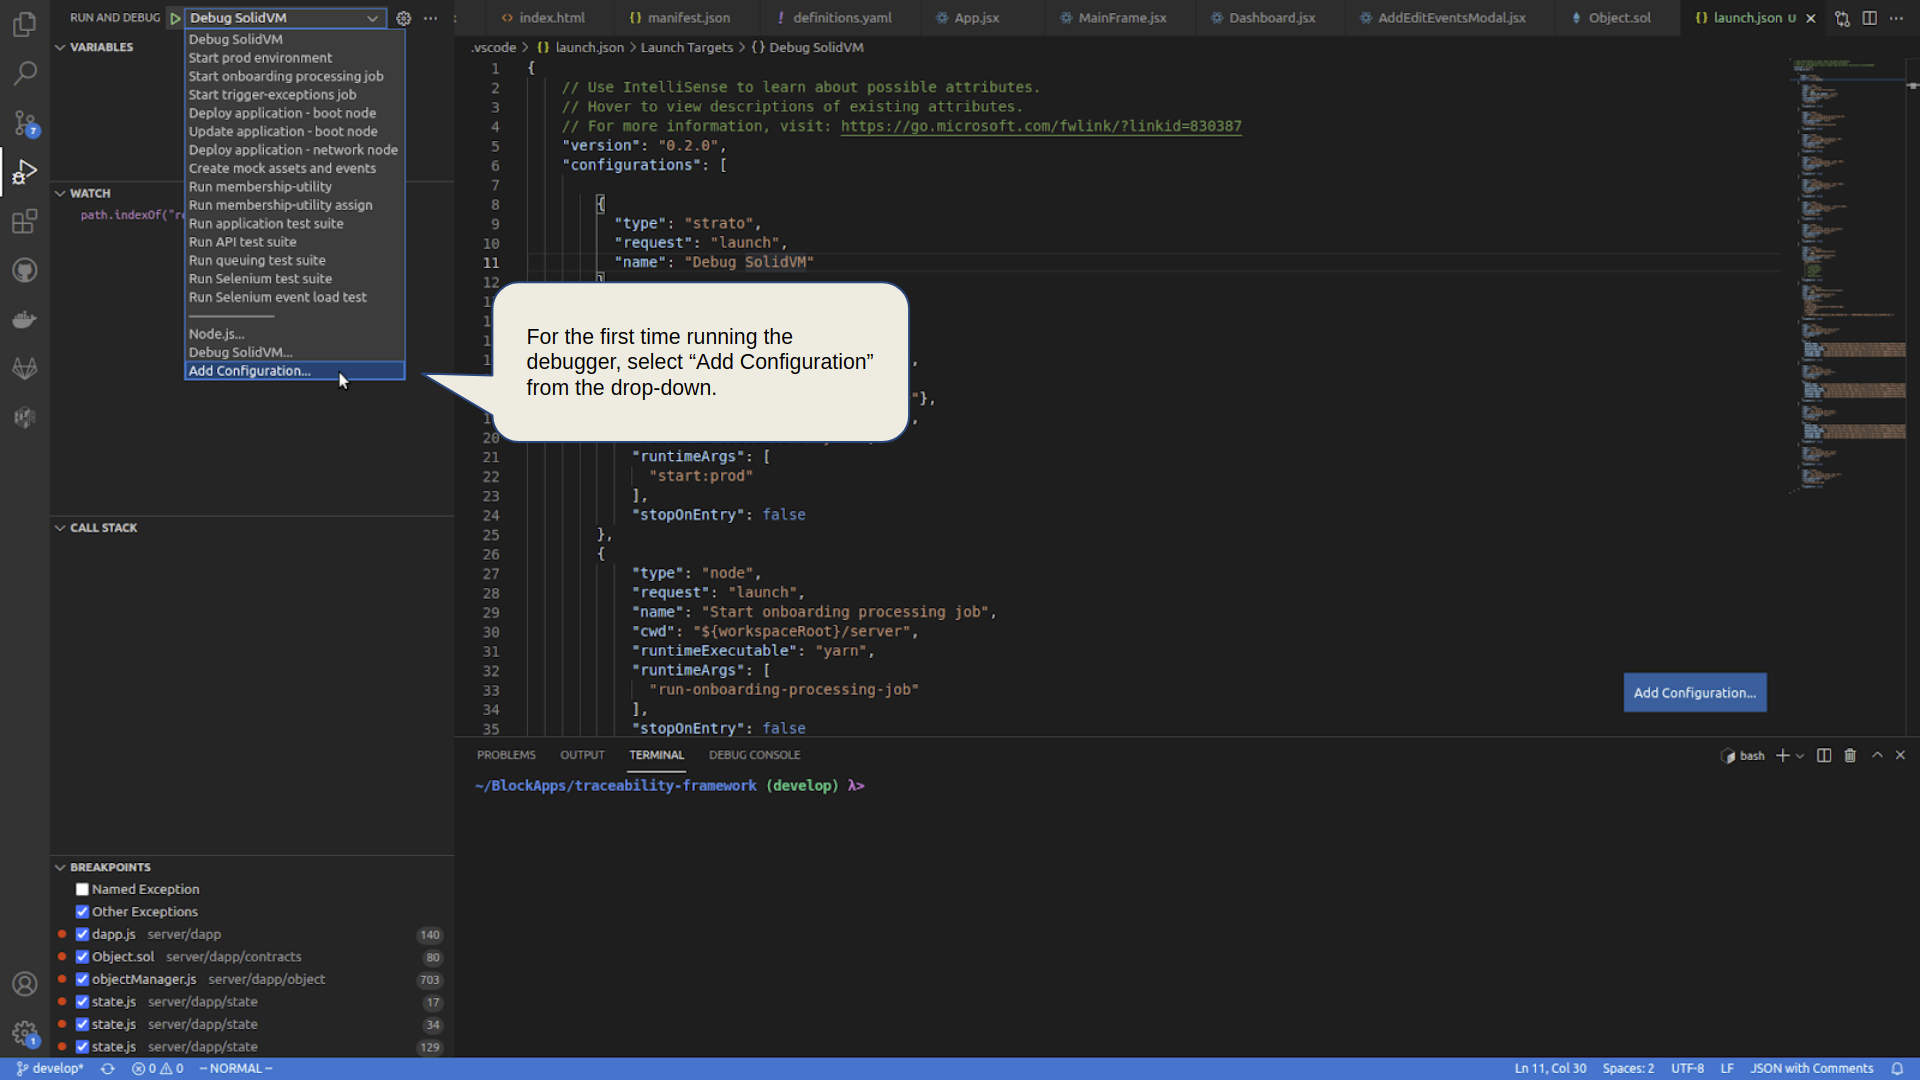
For the first time running the debugger, select “Add Configuration” from the drop-down.
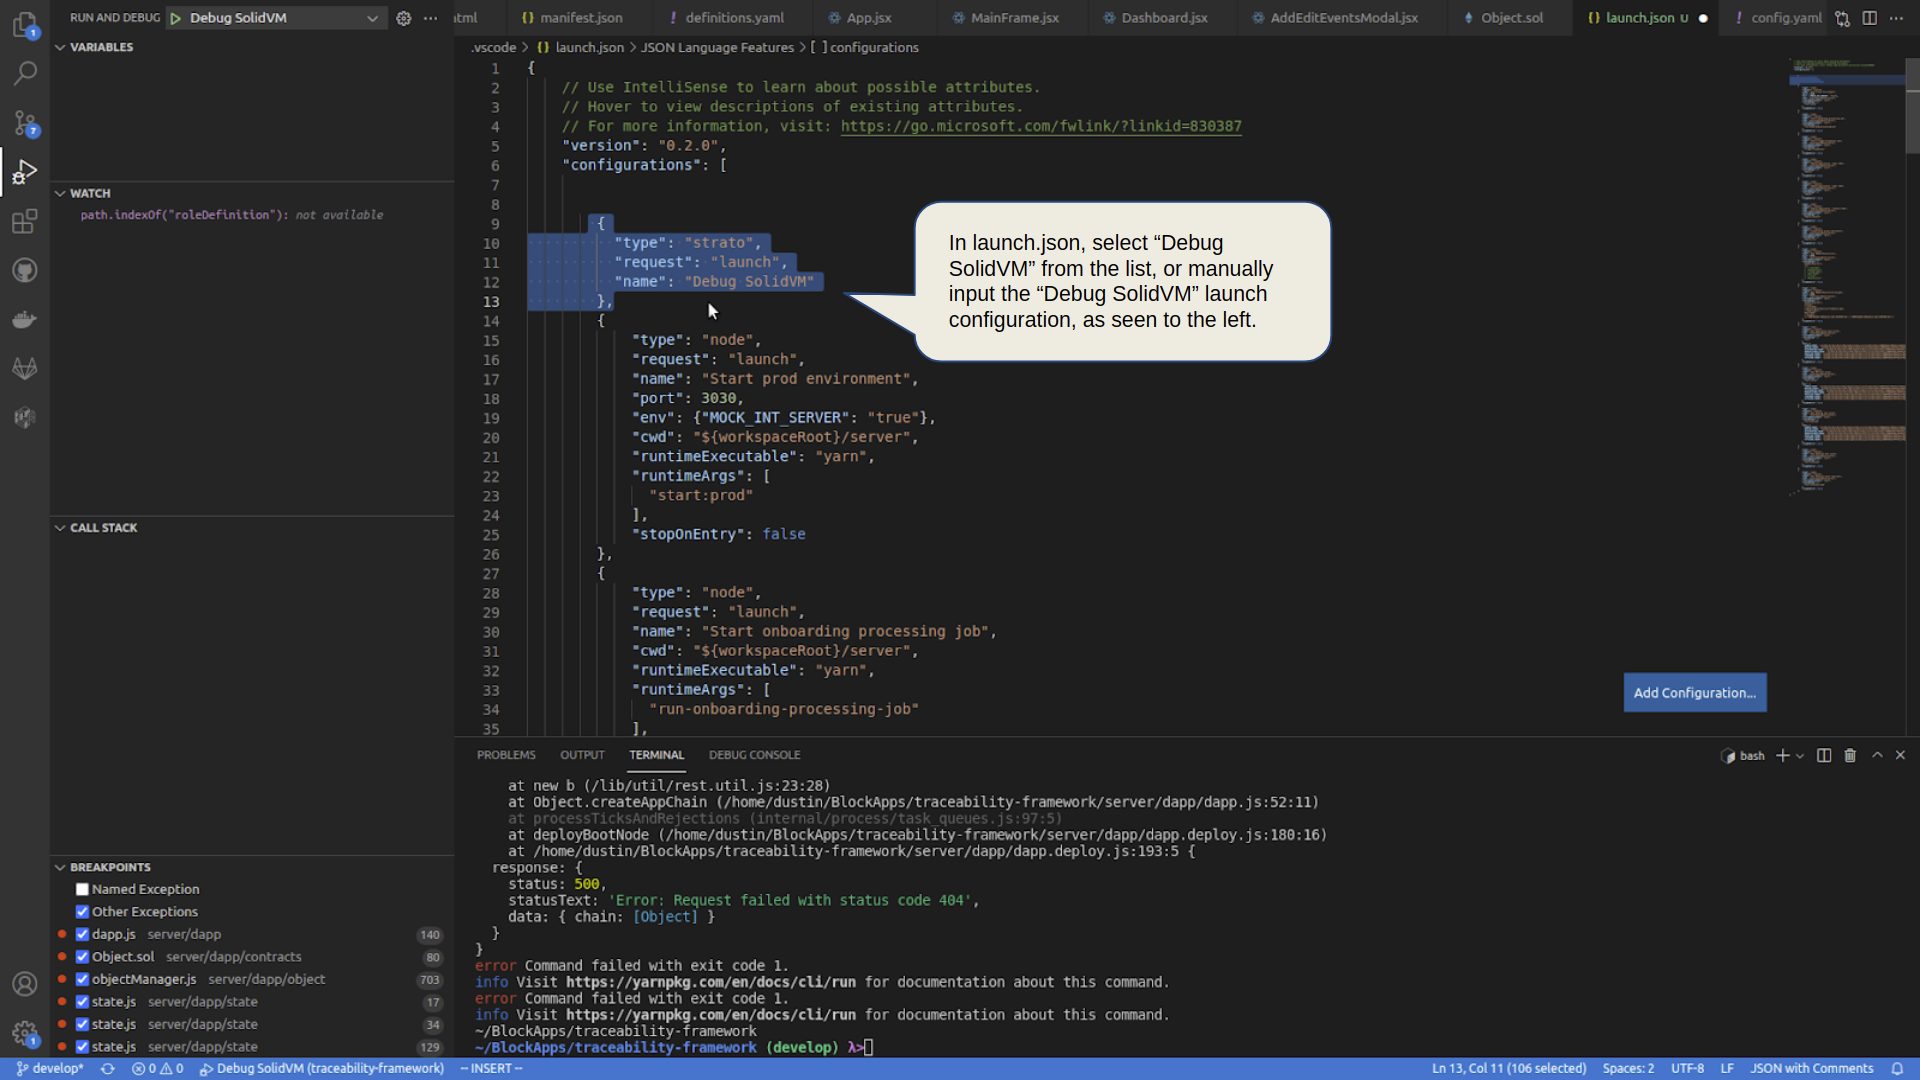
In launch.json, select “Debug SolidVM” from the list, or manually input the “Debug SolidVM” launch configuration, as seen to the left.
Now, select the “Debug SolidVM” configuration from the drop-down. Once the configuration has been created once, this step is all that is needed going forward.

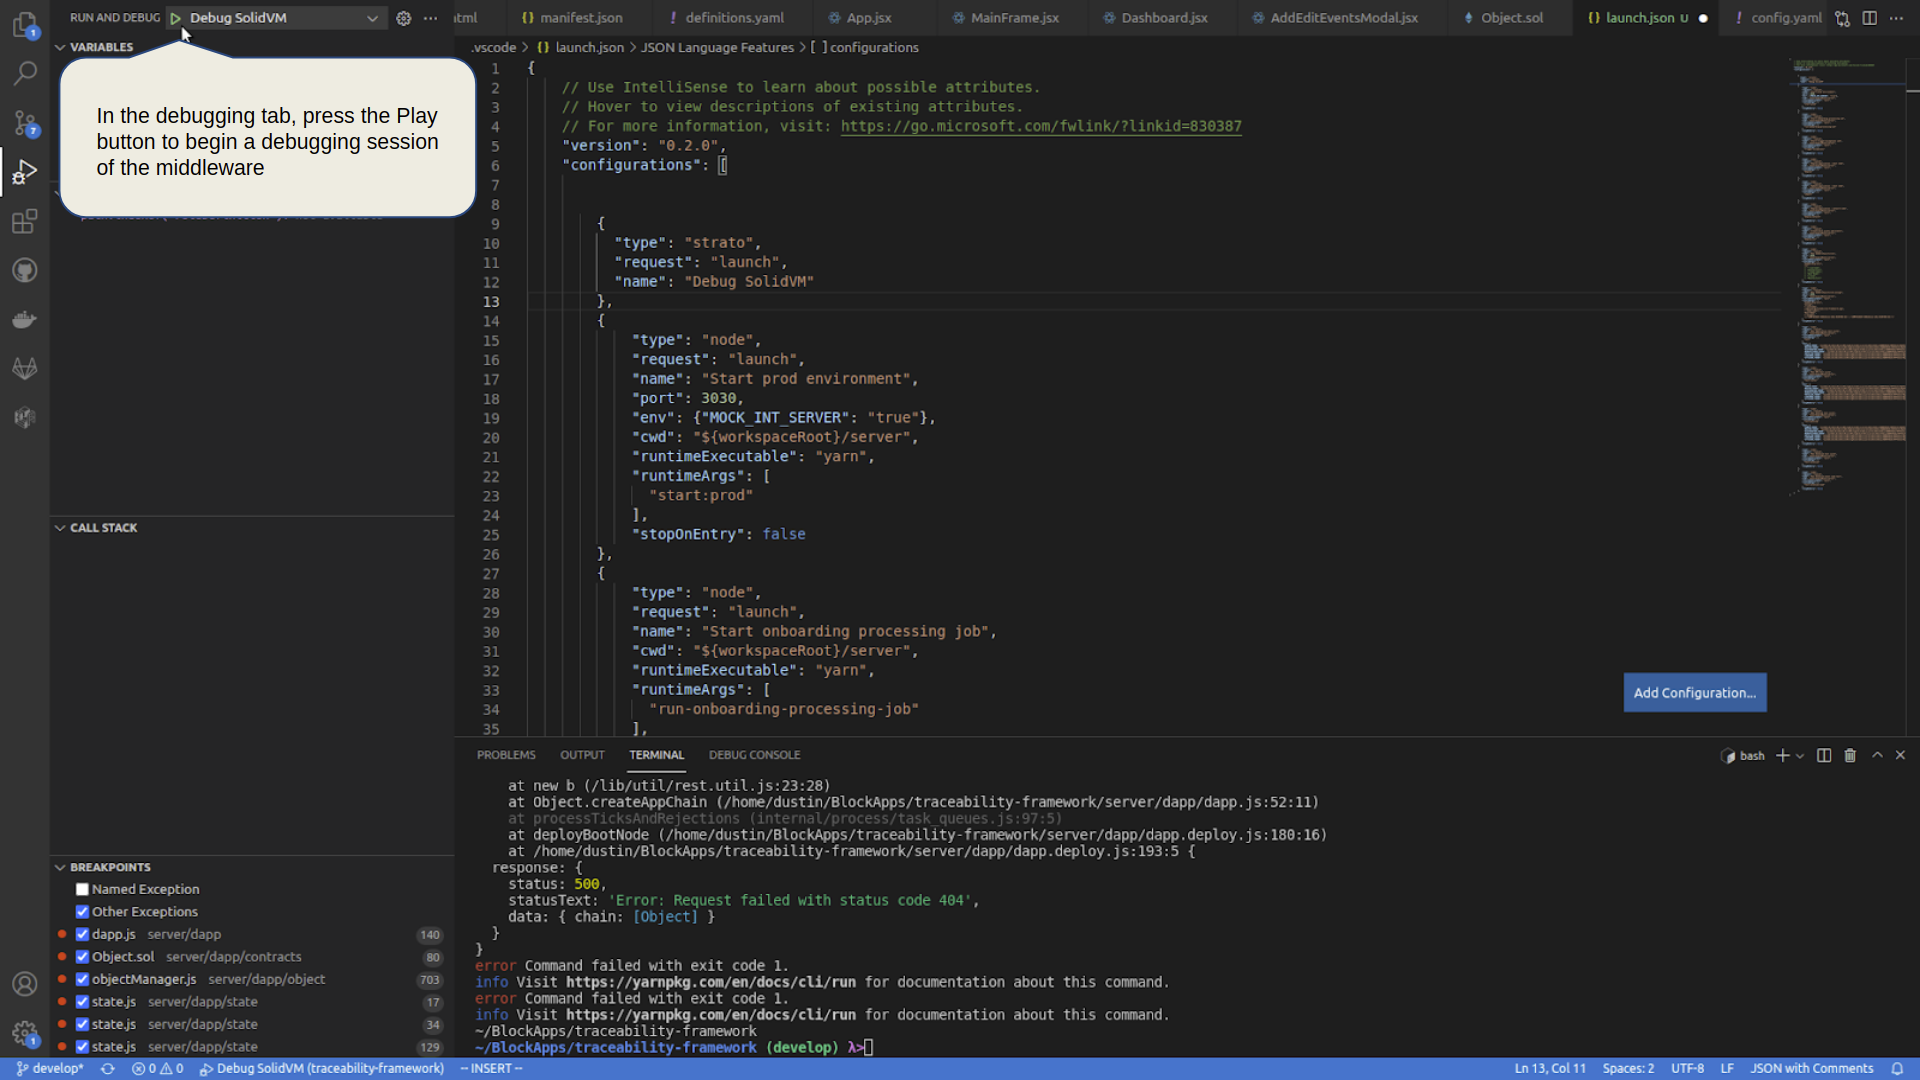
In the debugging tab, press the Play button to begin a debugging session of the middleware
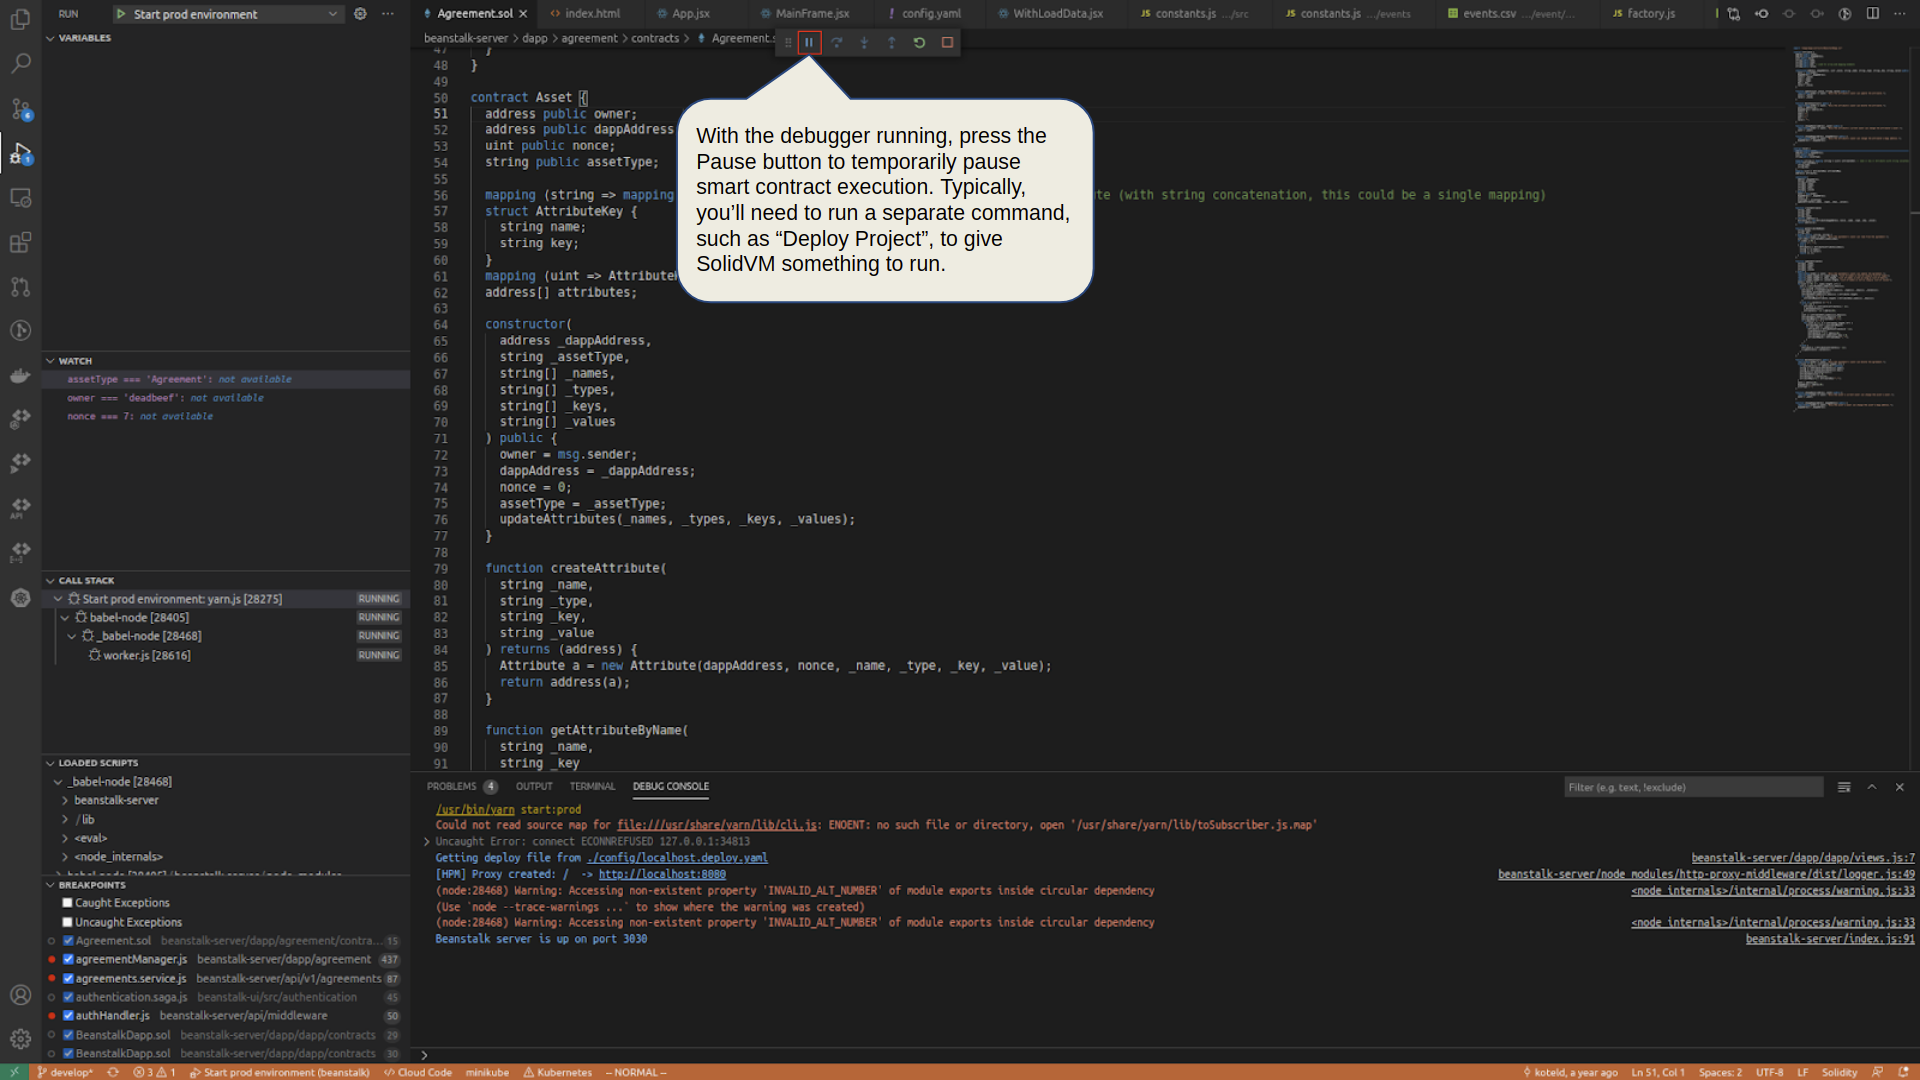
With the debugger running, press the Pause button to temporarily pause smart contract execution. Typically, you’ll need to run a separate command, such as Deploy Project, to give SolidVM something to run.
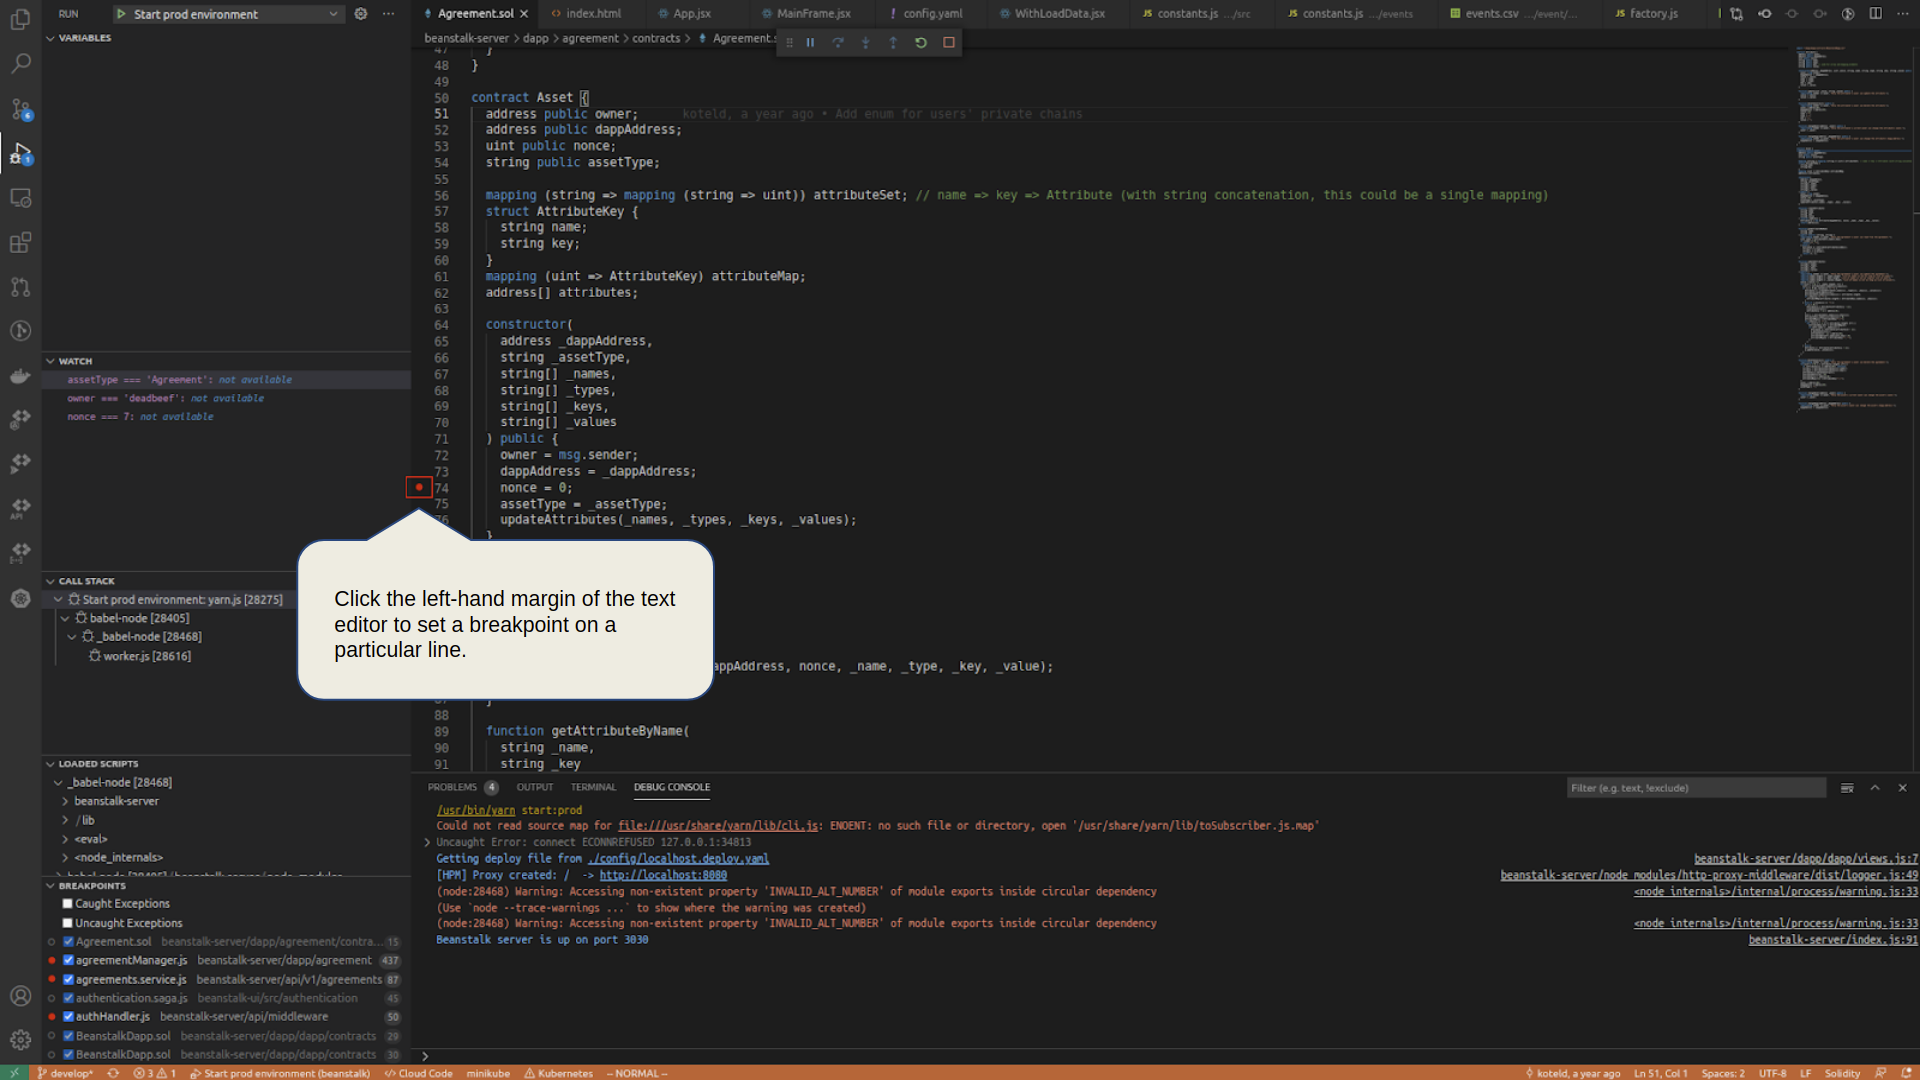
Click the left-hand margin of the text editor to set a breakpoint on a particular line.
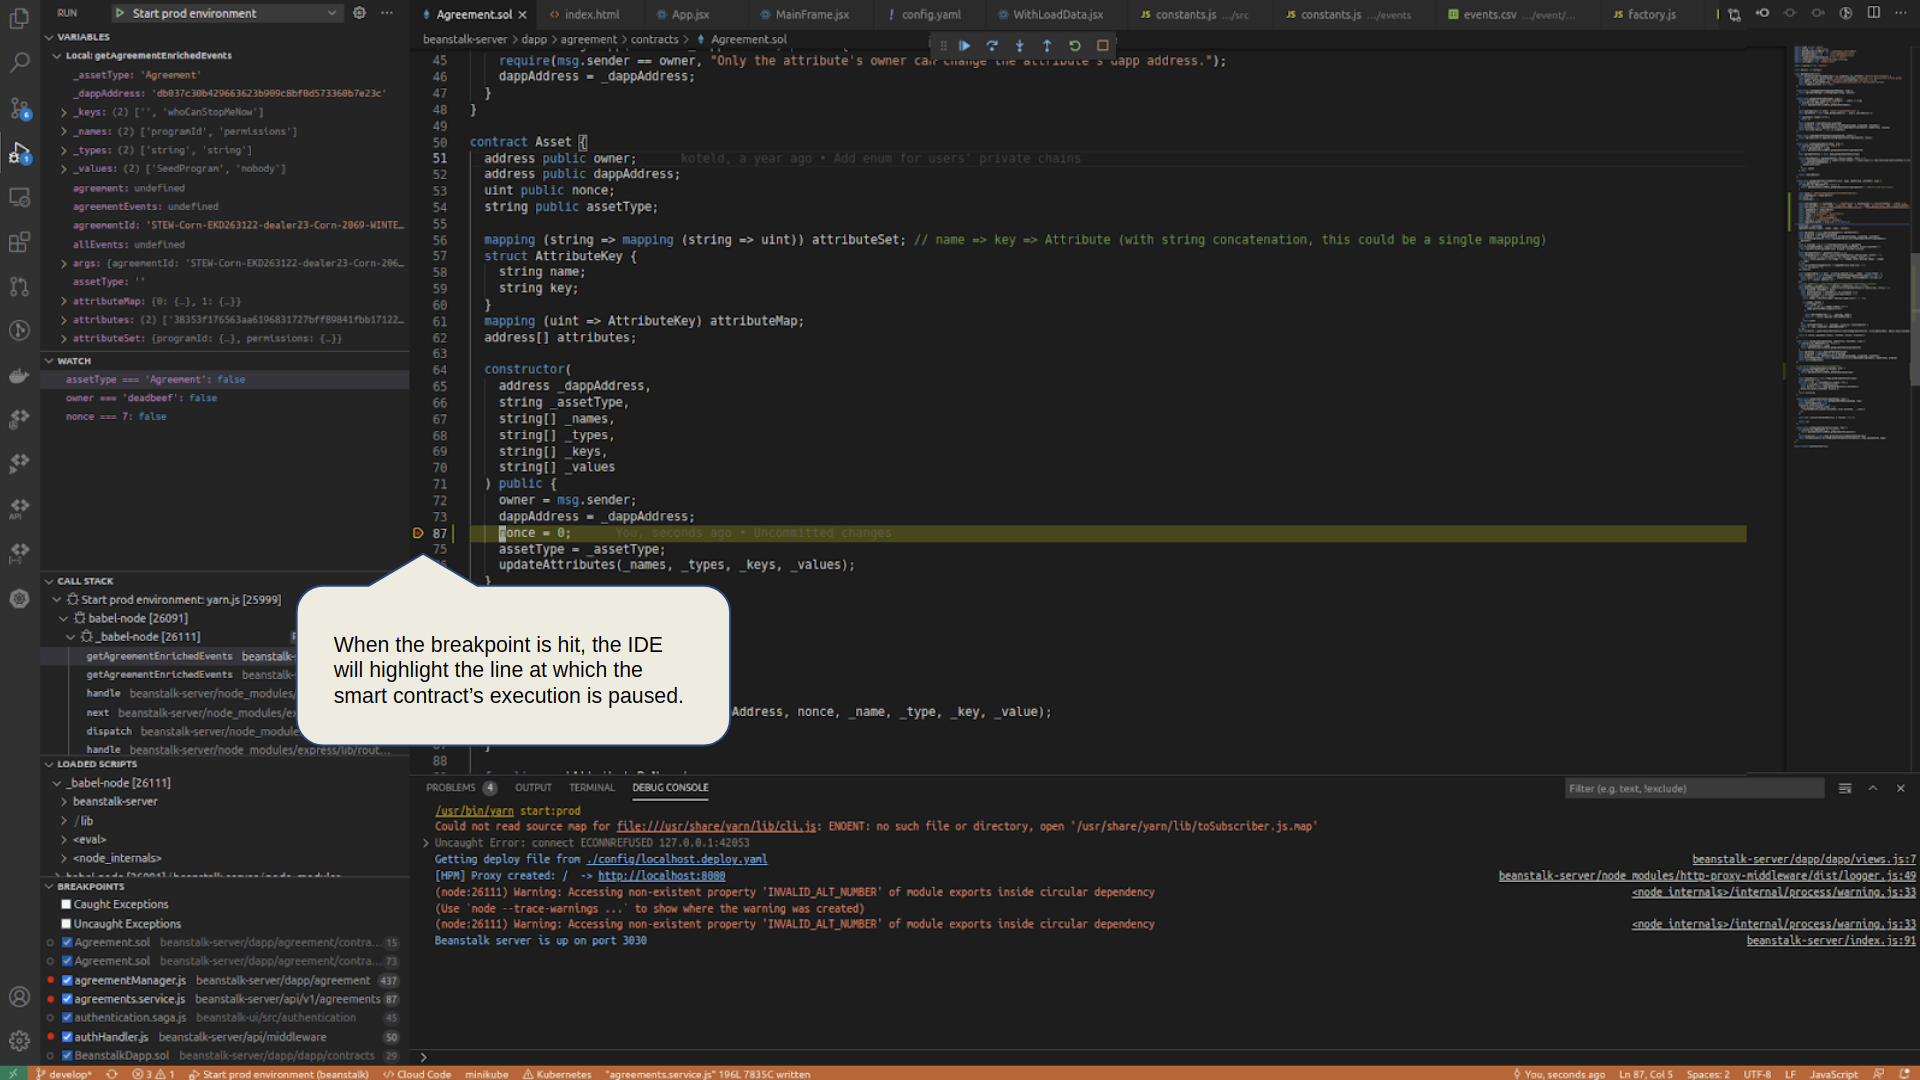
When the breakpoint is hit, the IDE will highlight the line at which the smart contract’s execution is paused.
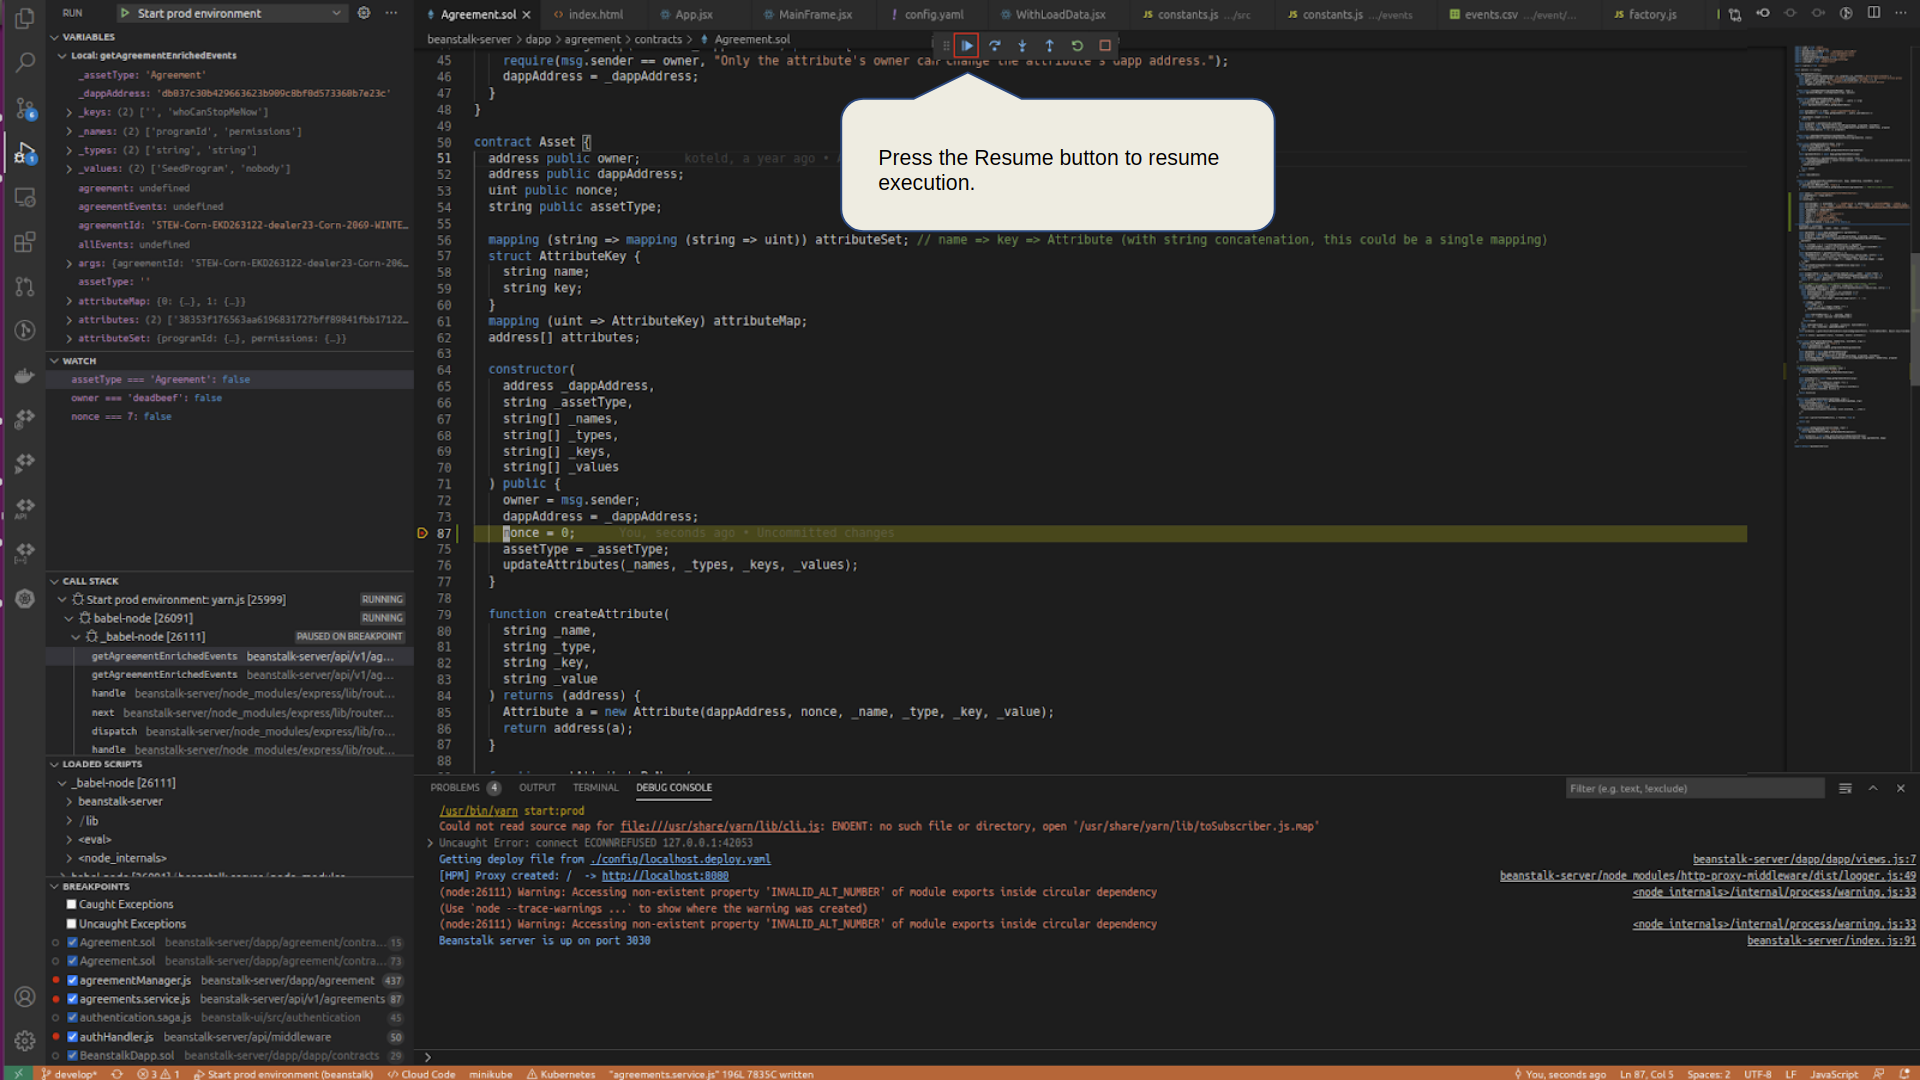
Press the Resume button to resume execution.
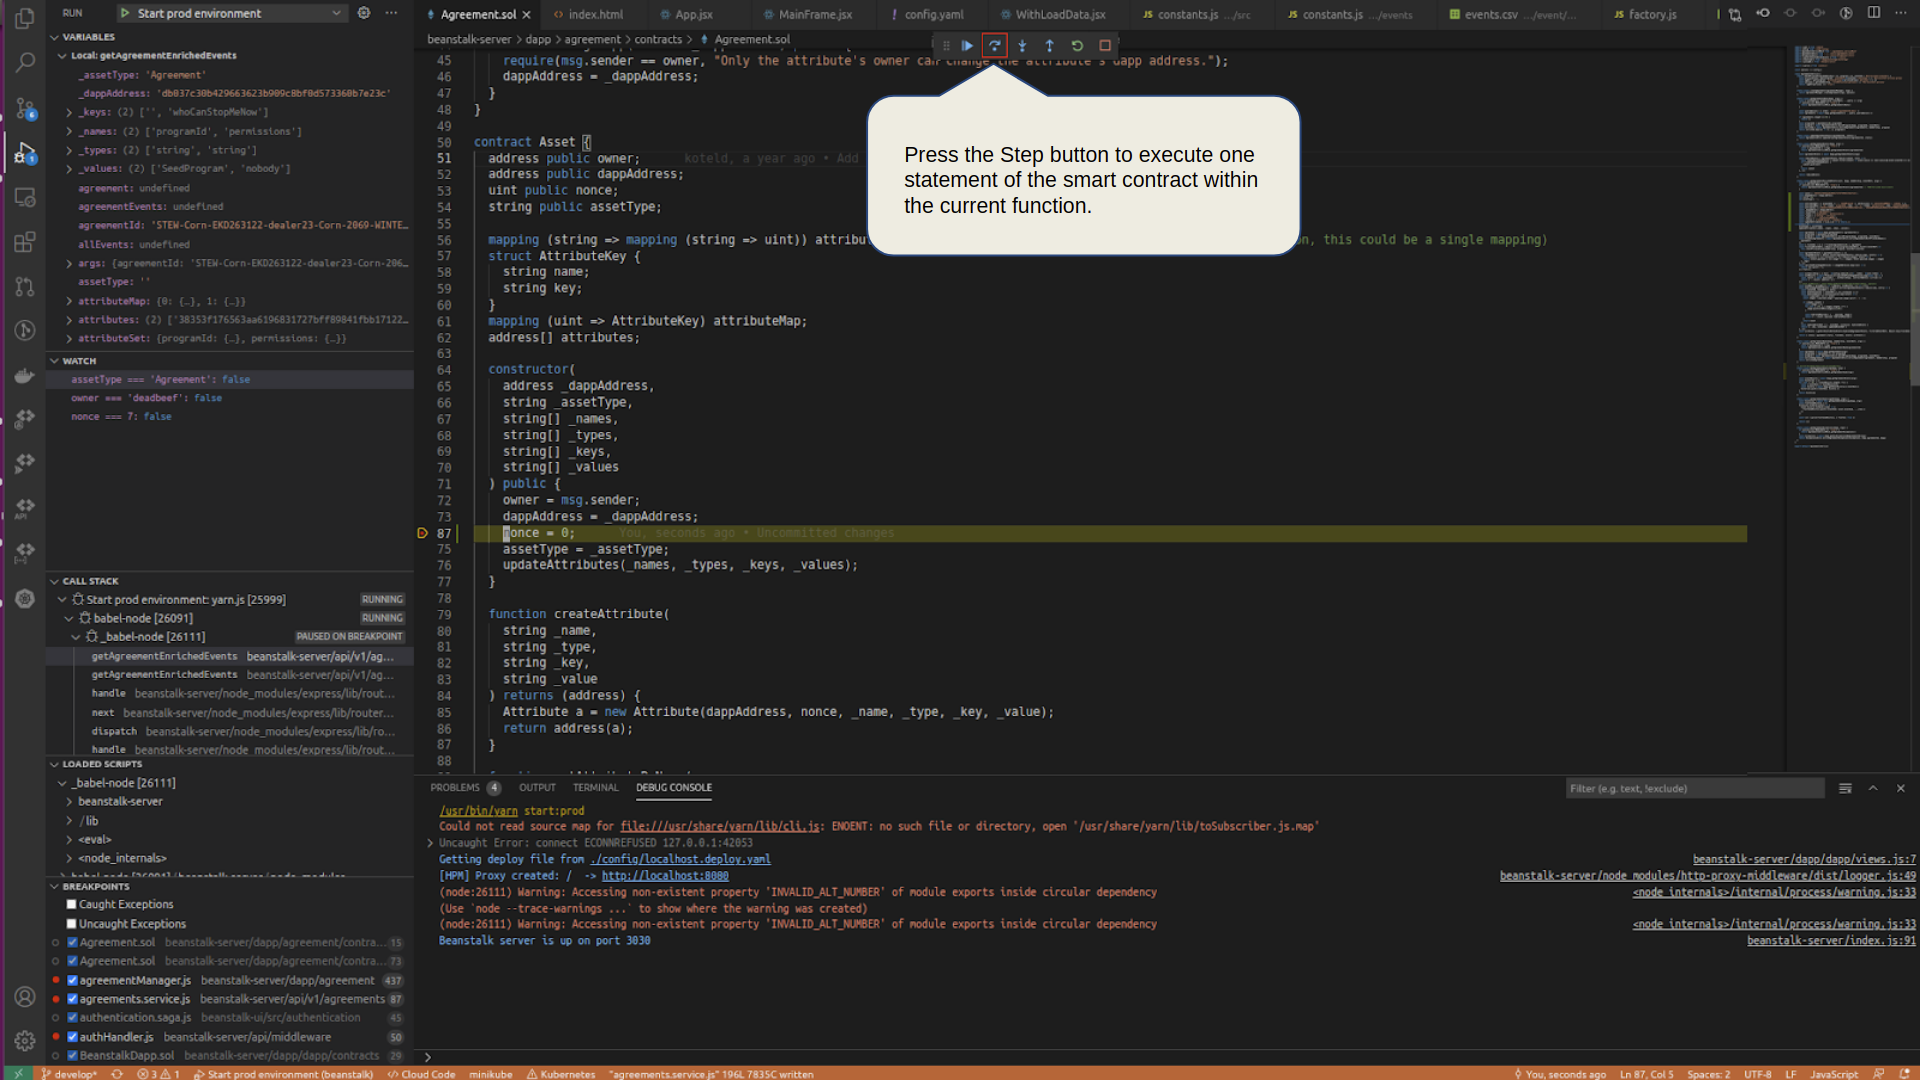
Press the Step button to execute one statement of the smart contract within the current function.
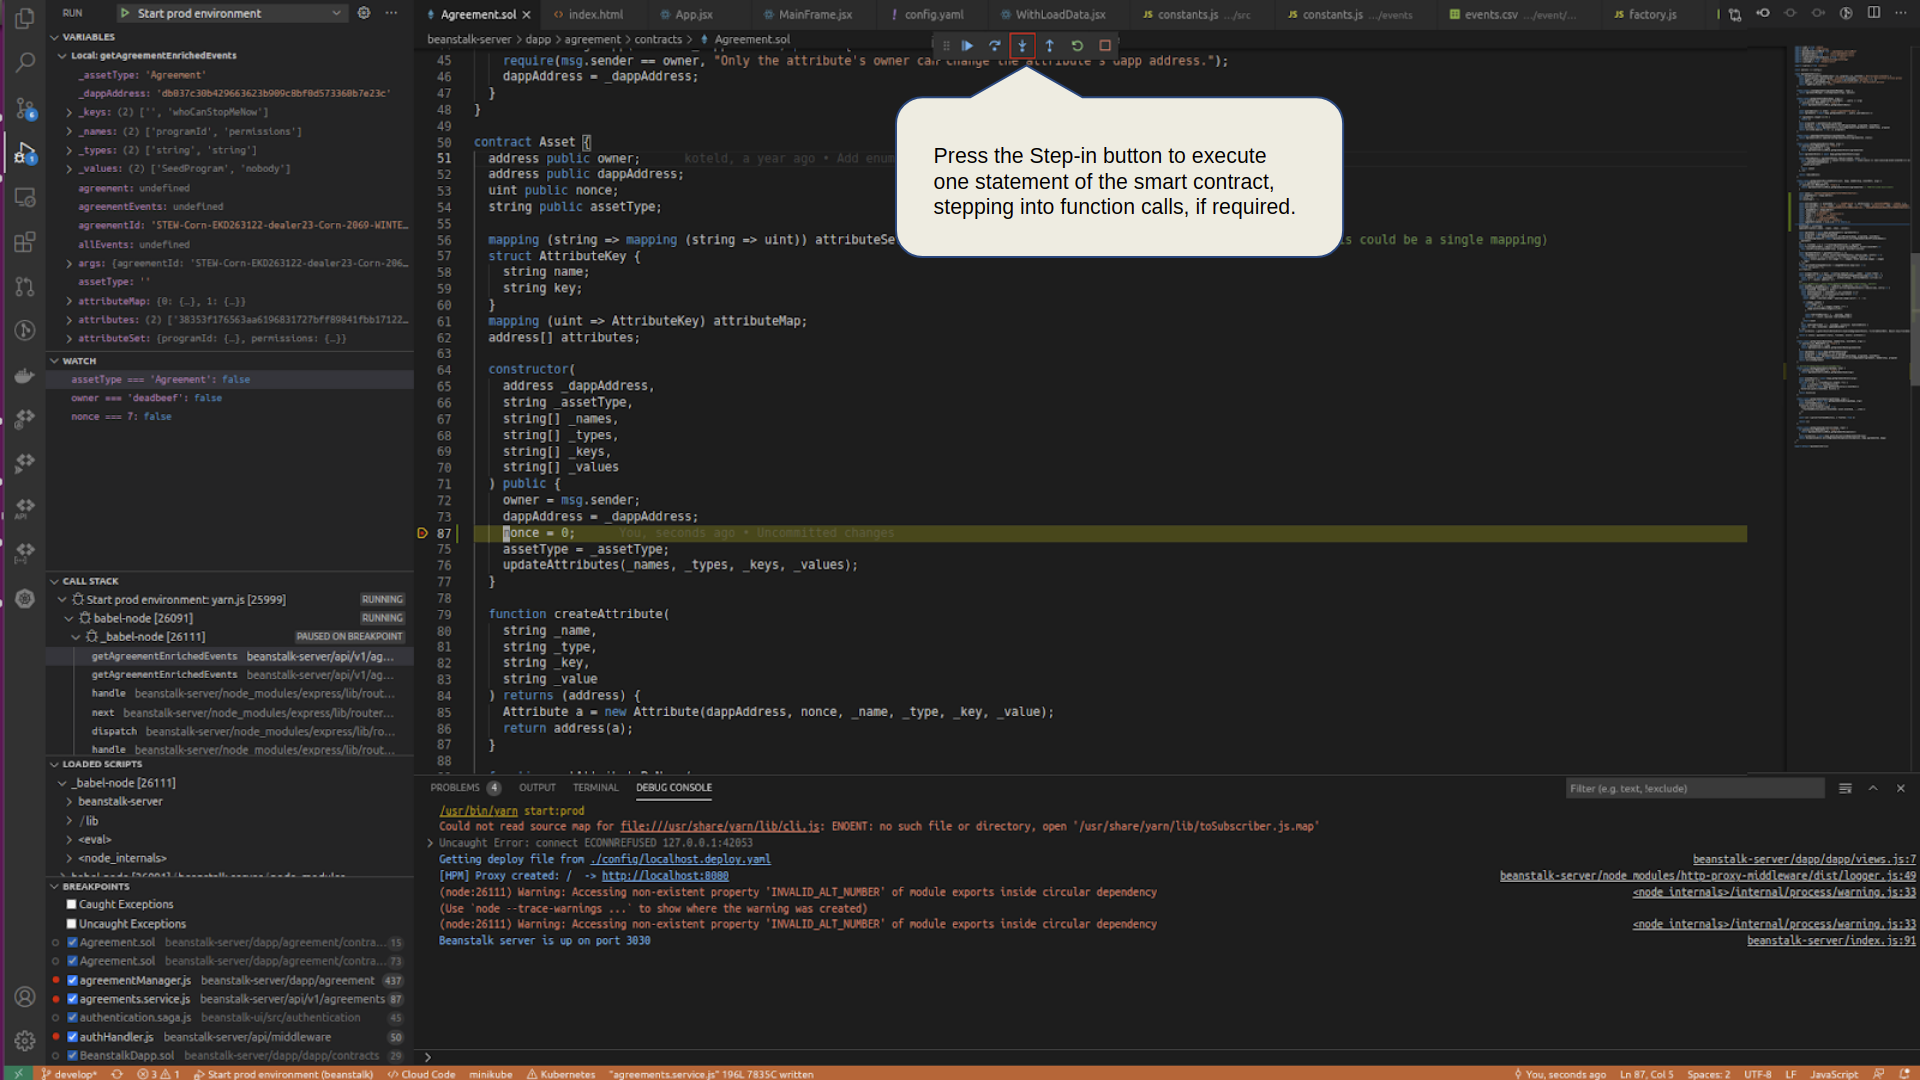
Press the Step-in button to execute one statement of the smart contract, stepping into function calls, if required.
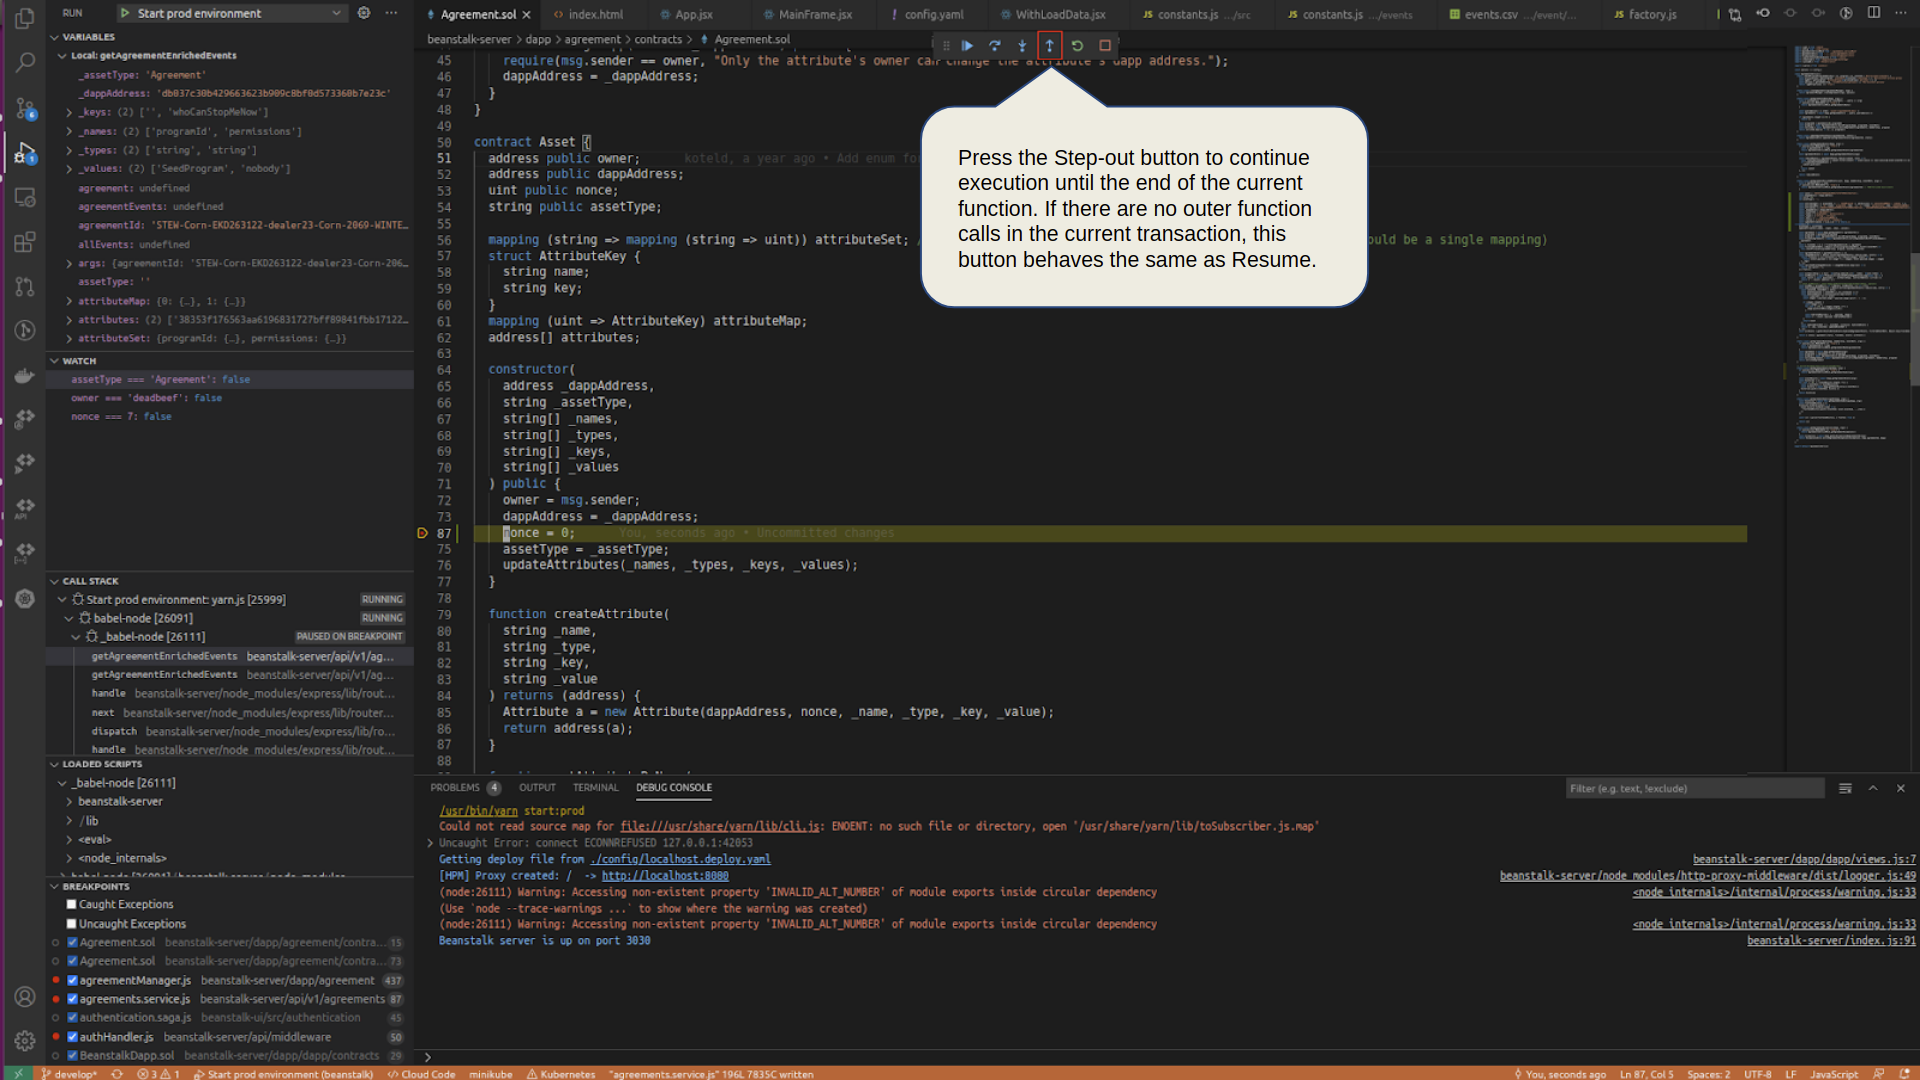
Press the Step-out button to continue execution until the end of the current function. If there are no outer function calls in the current transaction, this button behaves the same as Resume.
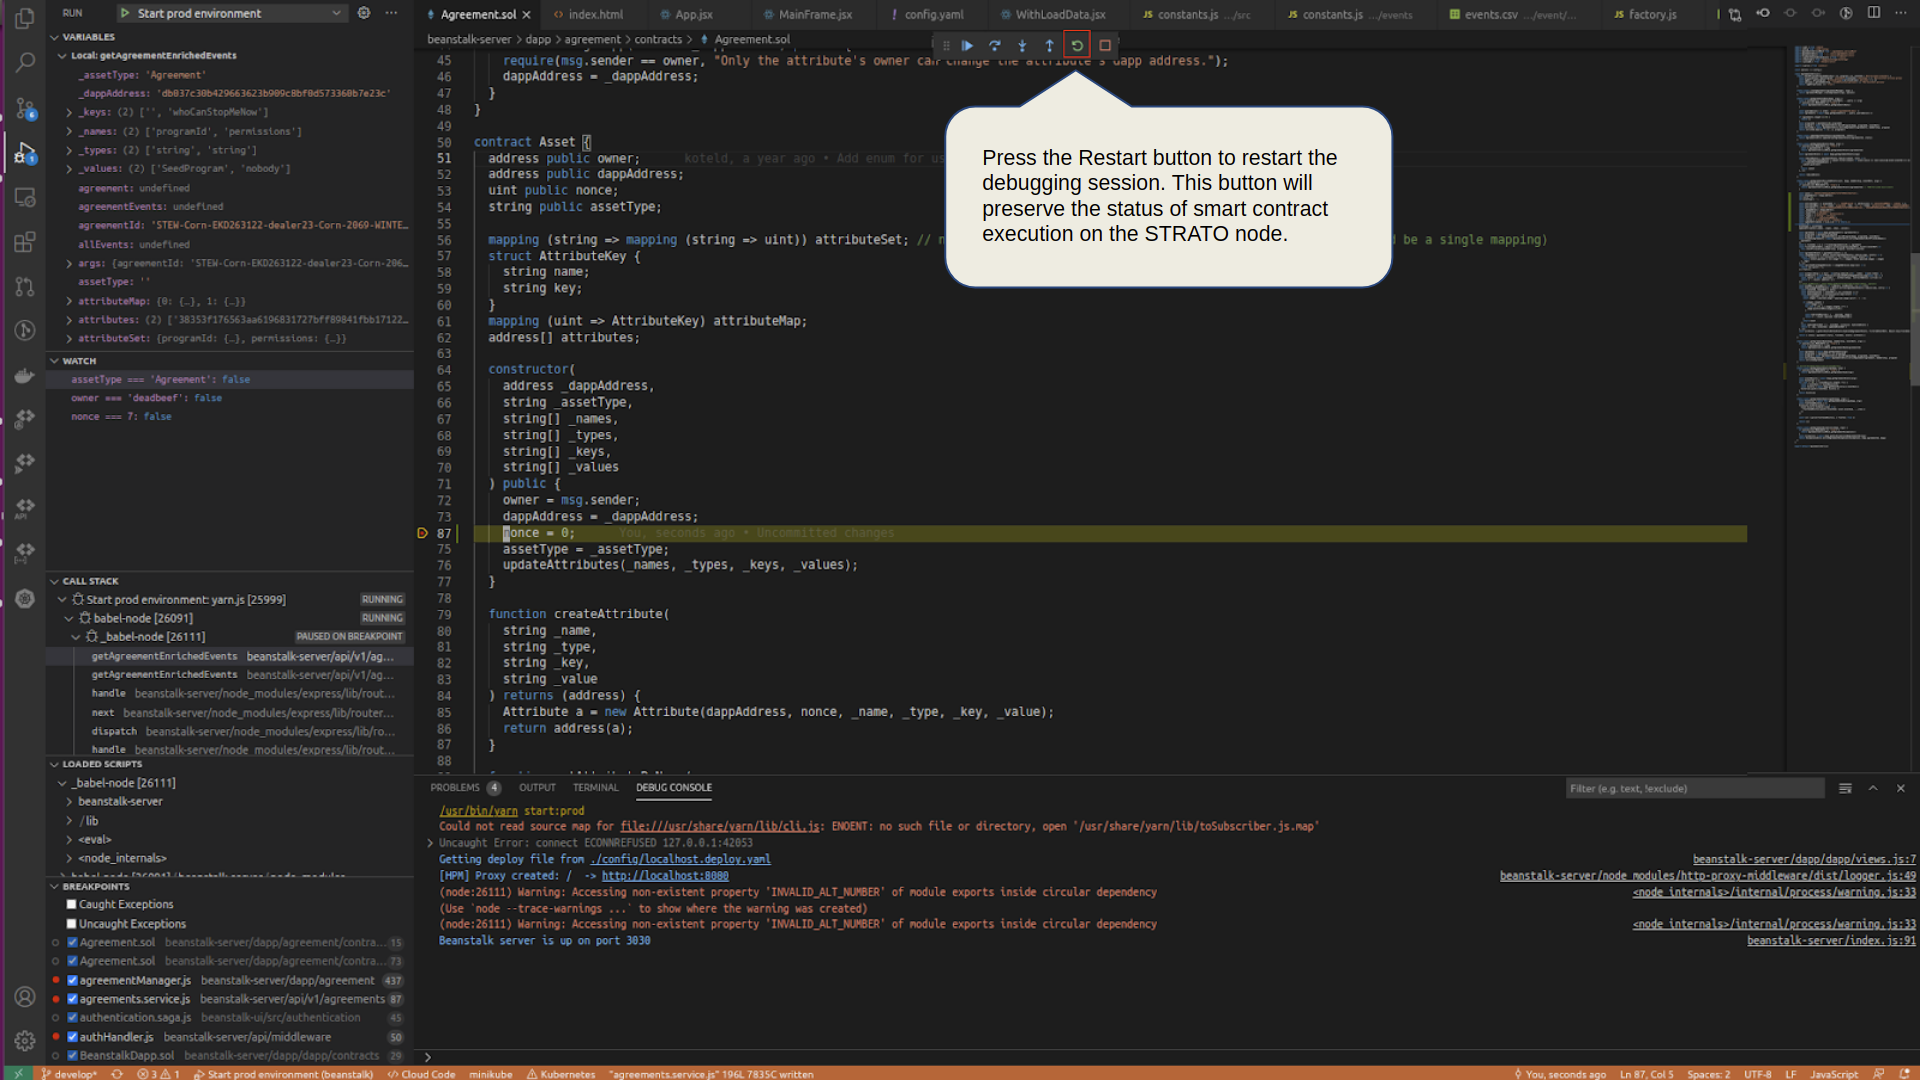
Press the Restart button to restart the debugging session. This button will preserve the status of smart contract execution on the STRATO node.
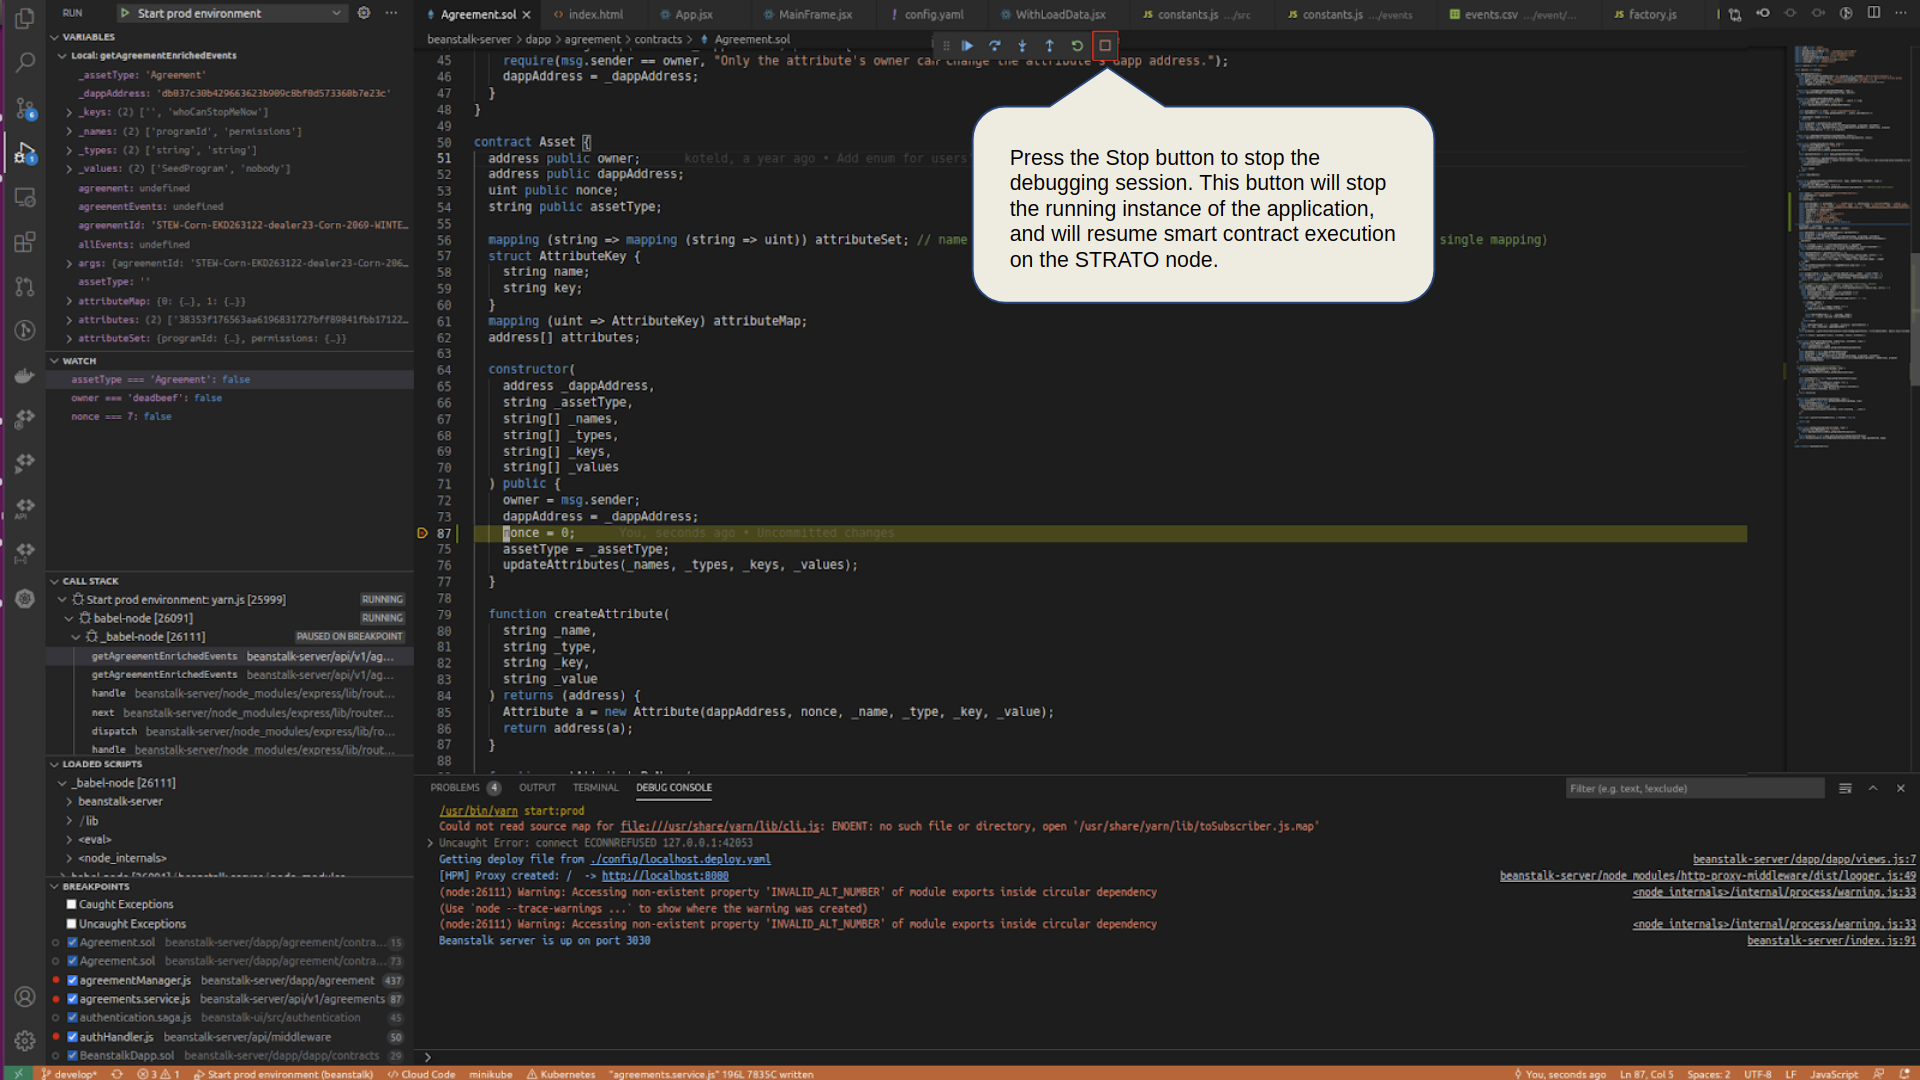
Press the Stop button to stop the debugging session. This button will stop the running instance of the application, and will resume smart contract execution on the STRATO node.
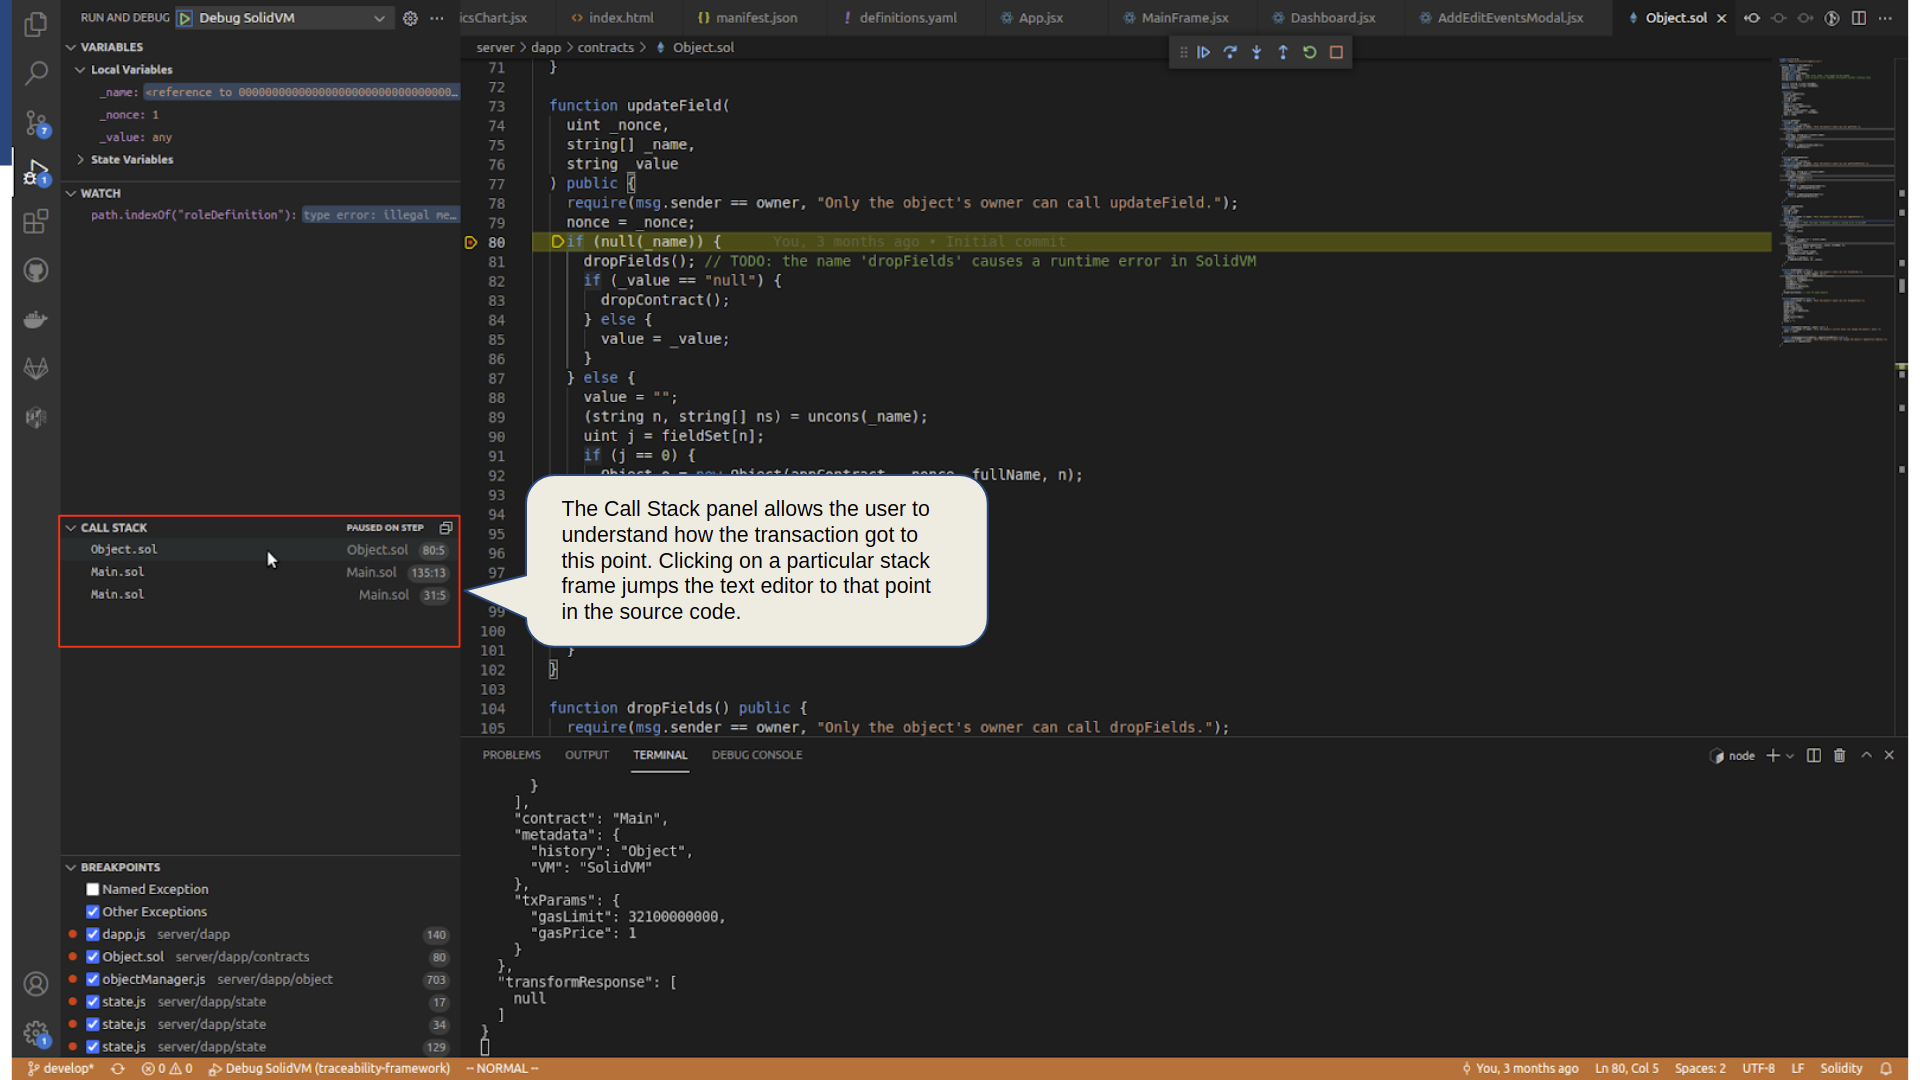
The Call Stack panel allows the user to understand how the transaction got to this point. Clicking on a particular stack frame jumps the text editor to that point in the source code.
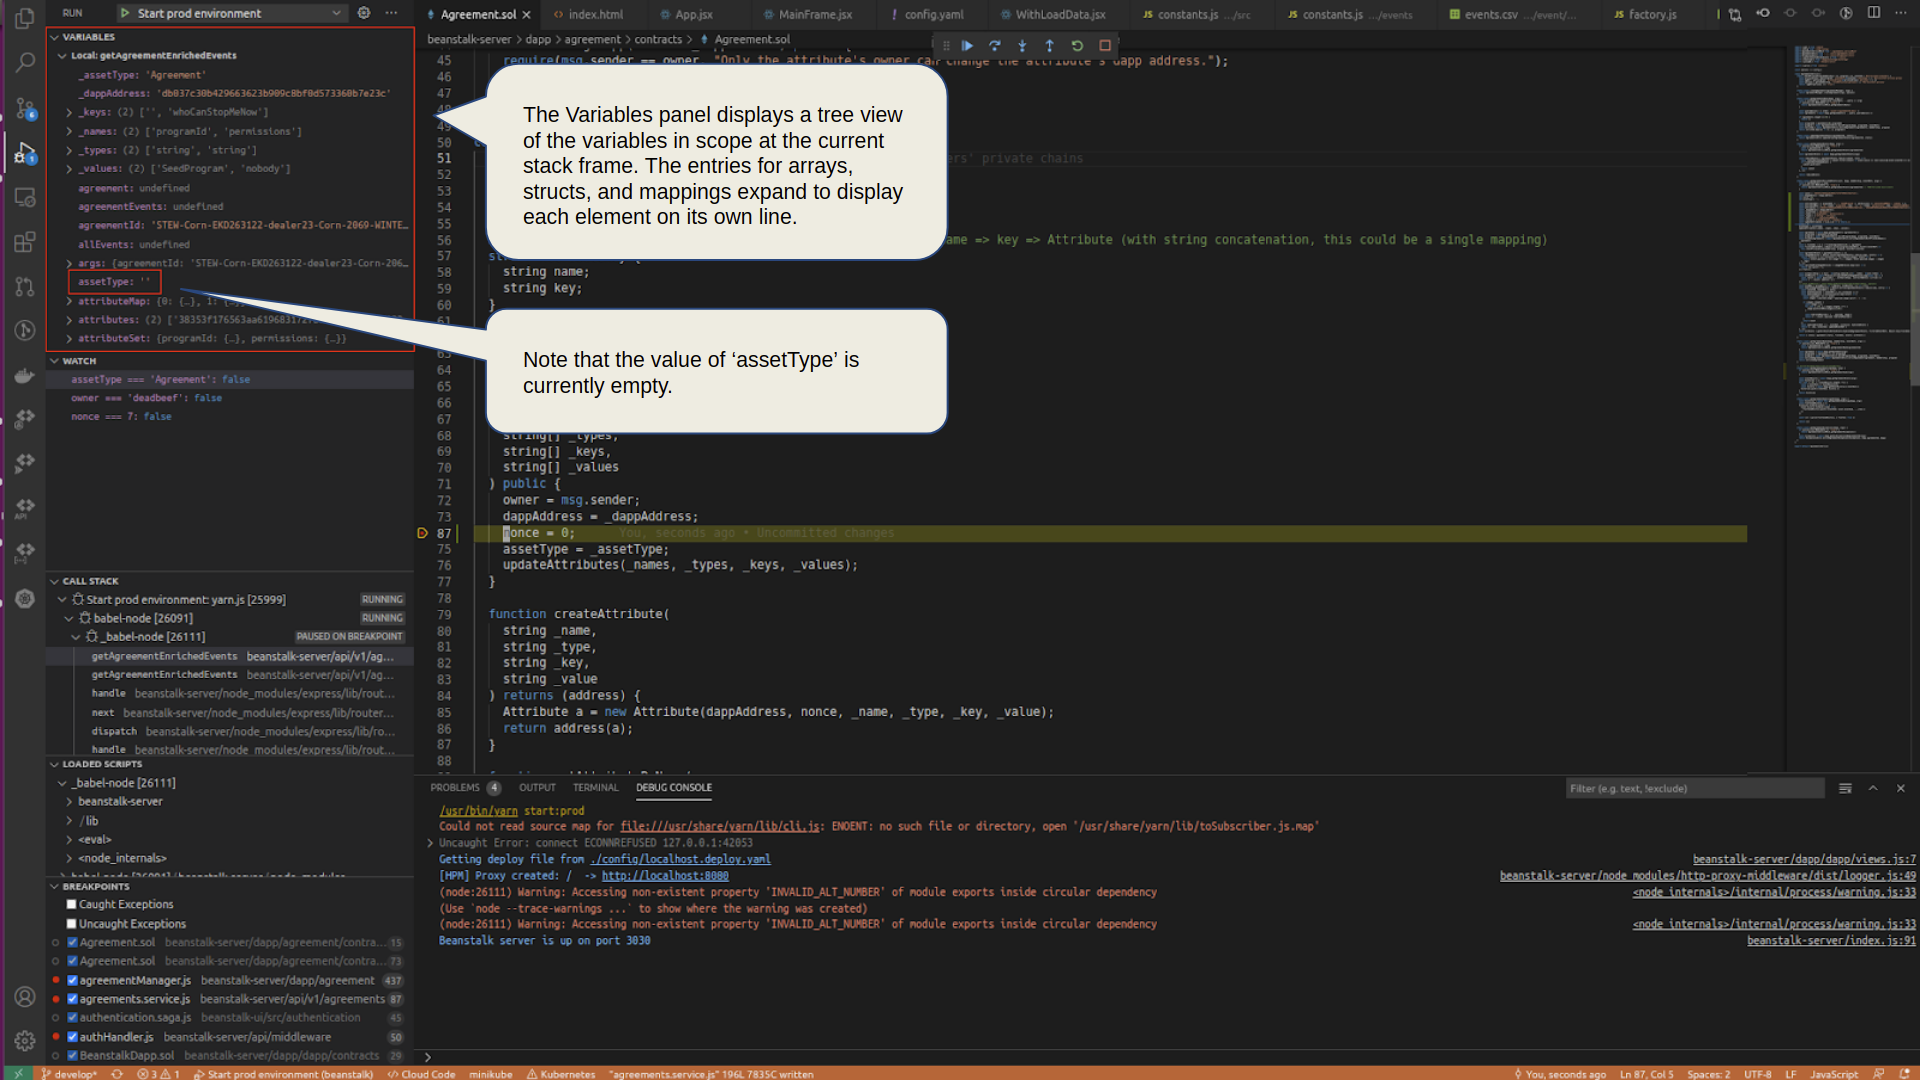
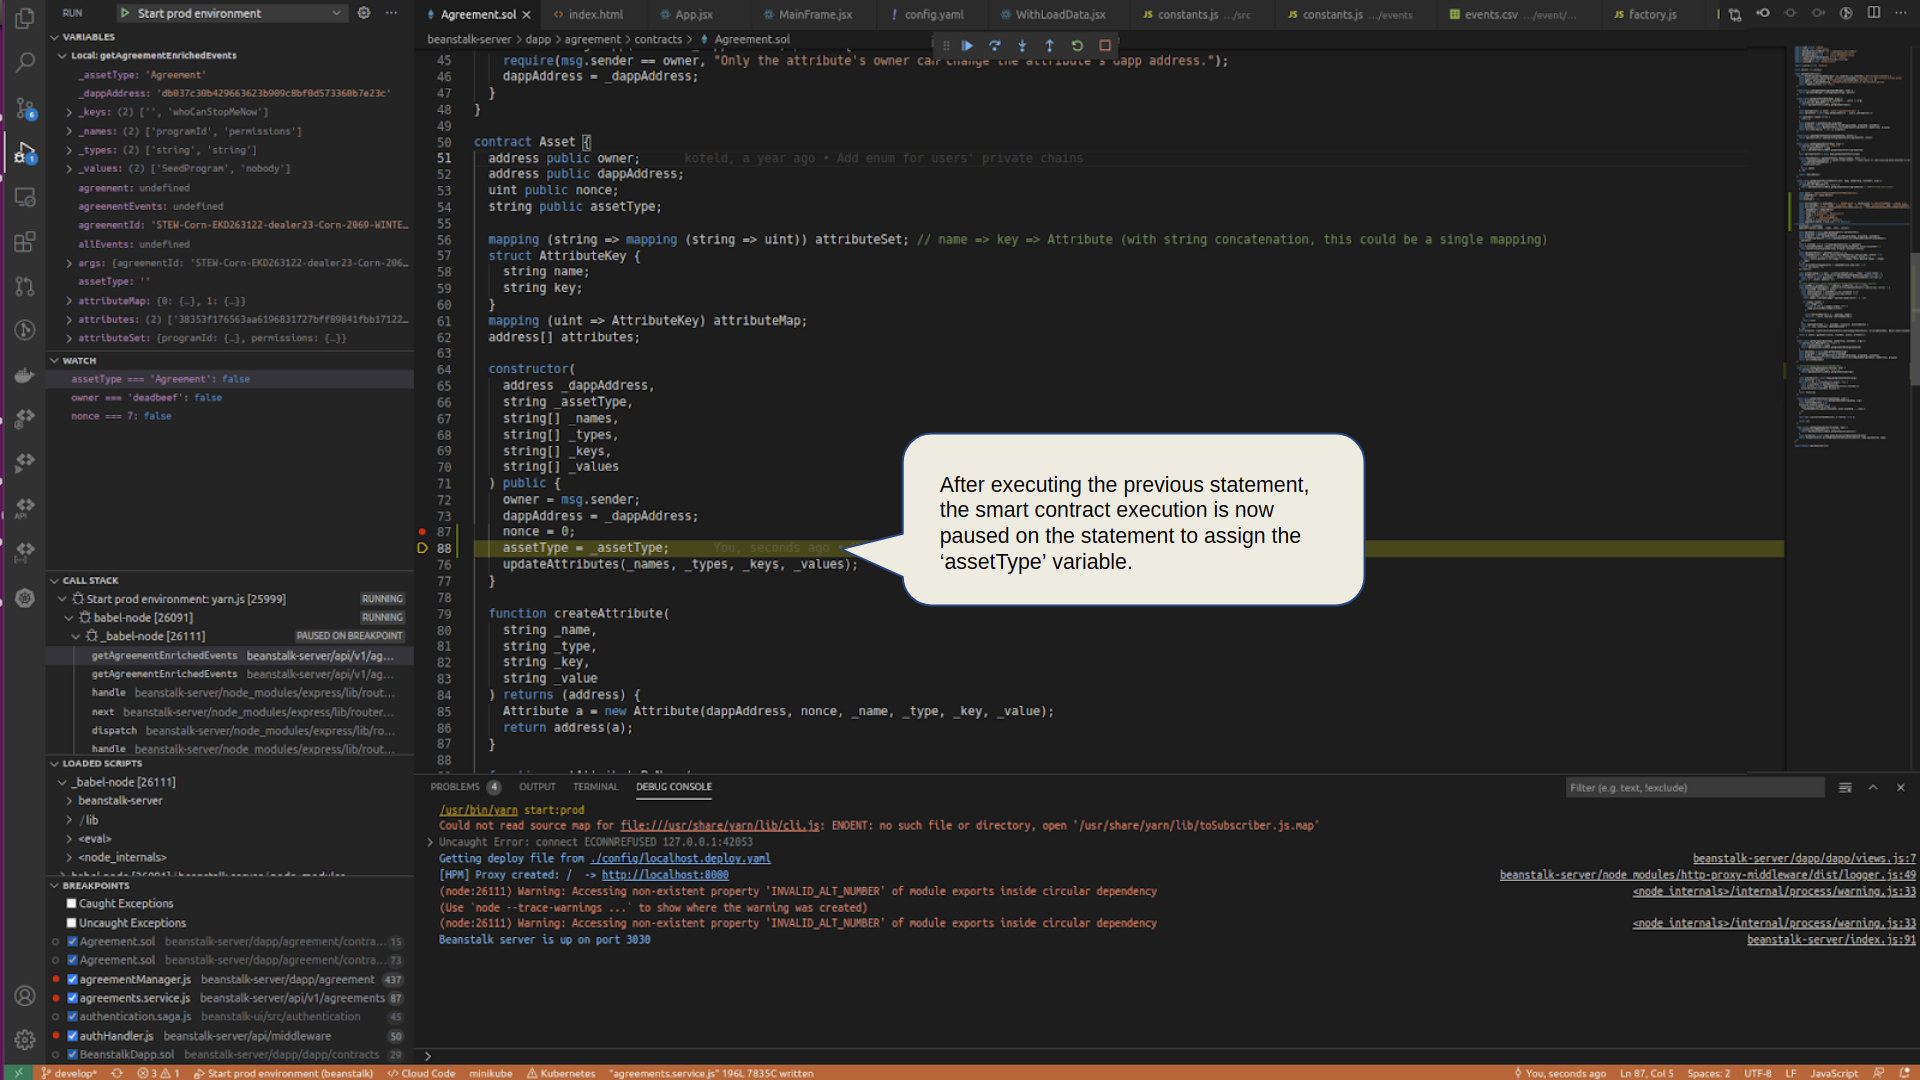
The Variables panel displays a tree view of the variables in scope at the current stack frame. The entries for arrays, structs, and mappings expand to display each element on its own line.
Note that the value of assetType is currently empty.
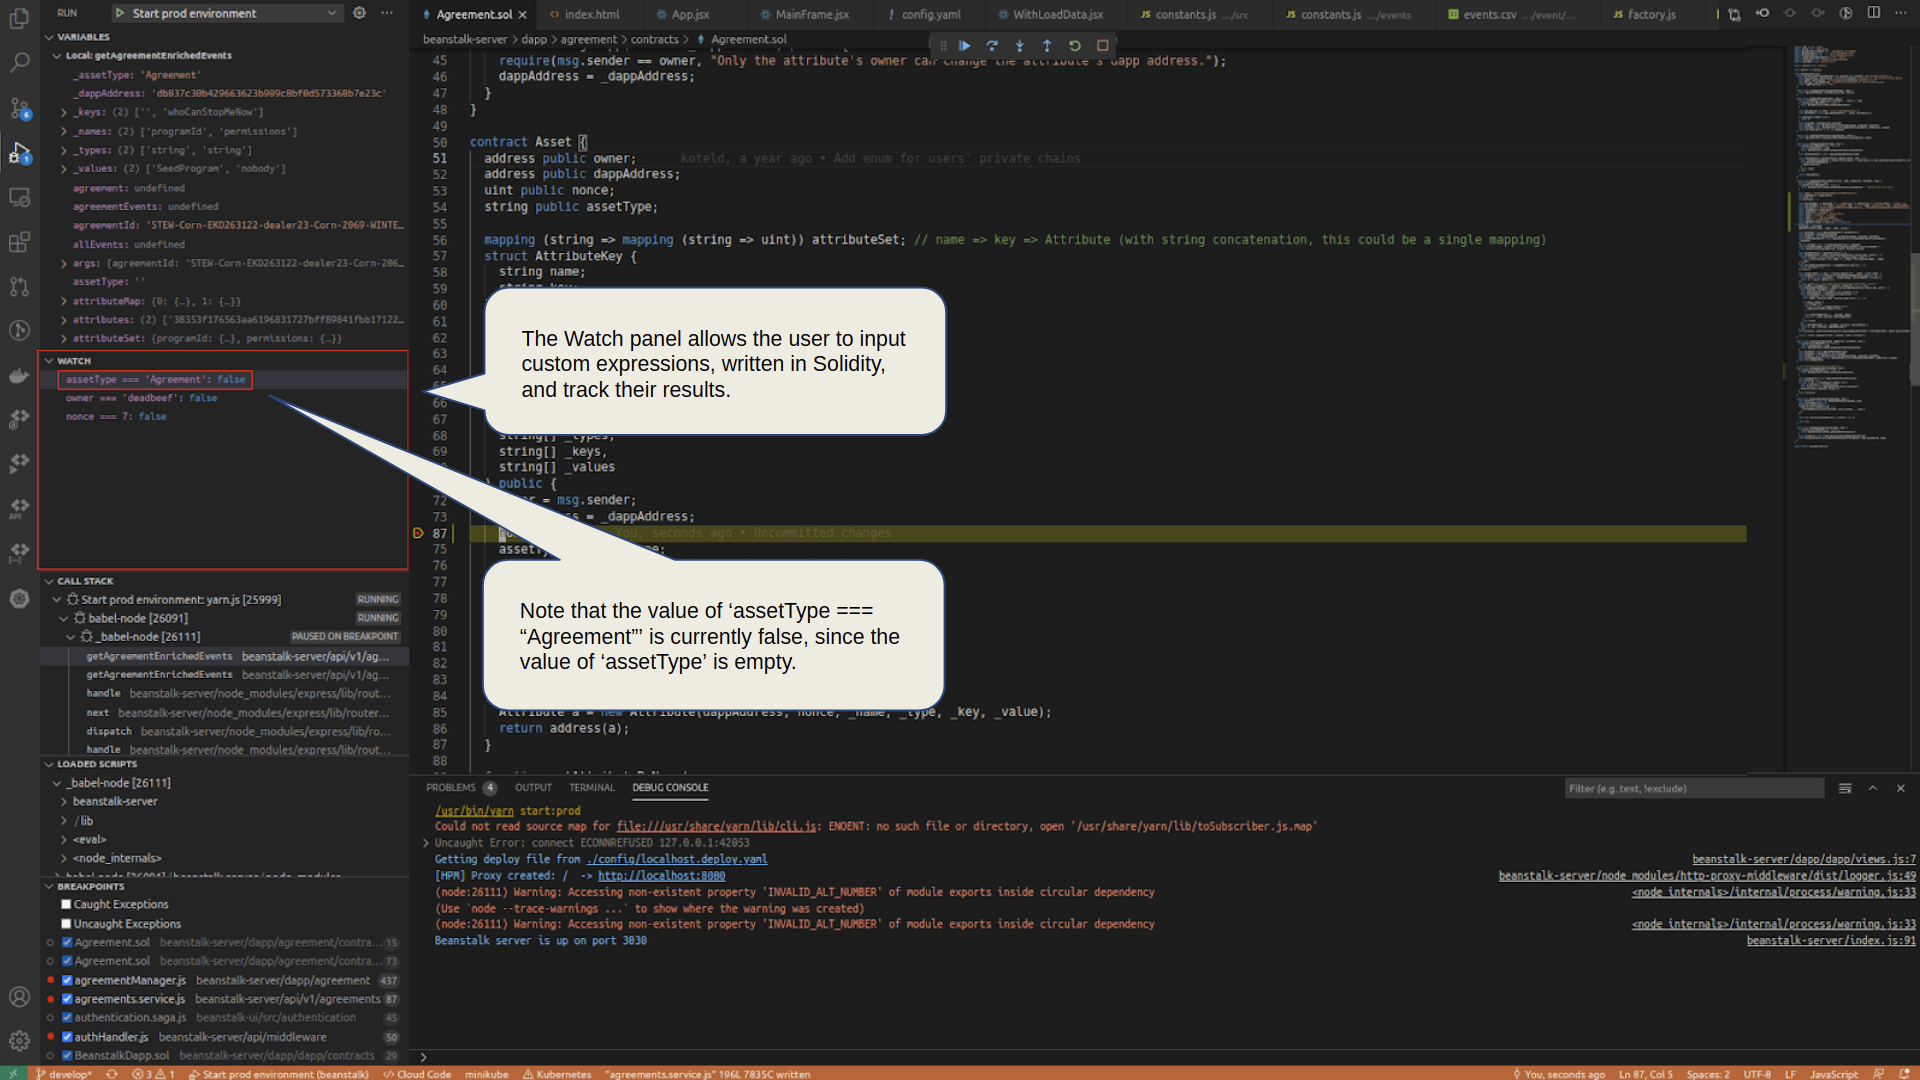
The Watch panel allows the user to input custom expressions, written in Solidity, and track their results.
Note that the value of assetType === “Agreement” is currently false, since the value of assetType is empty.
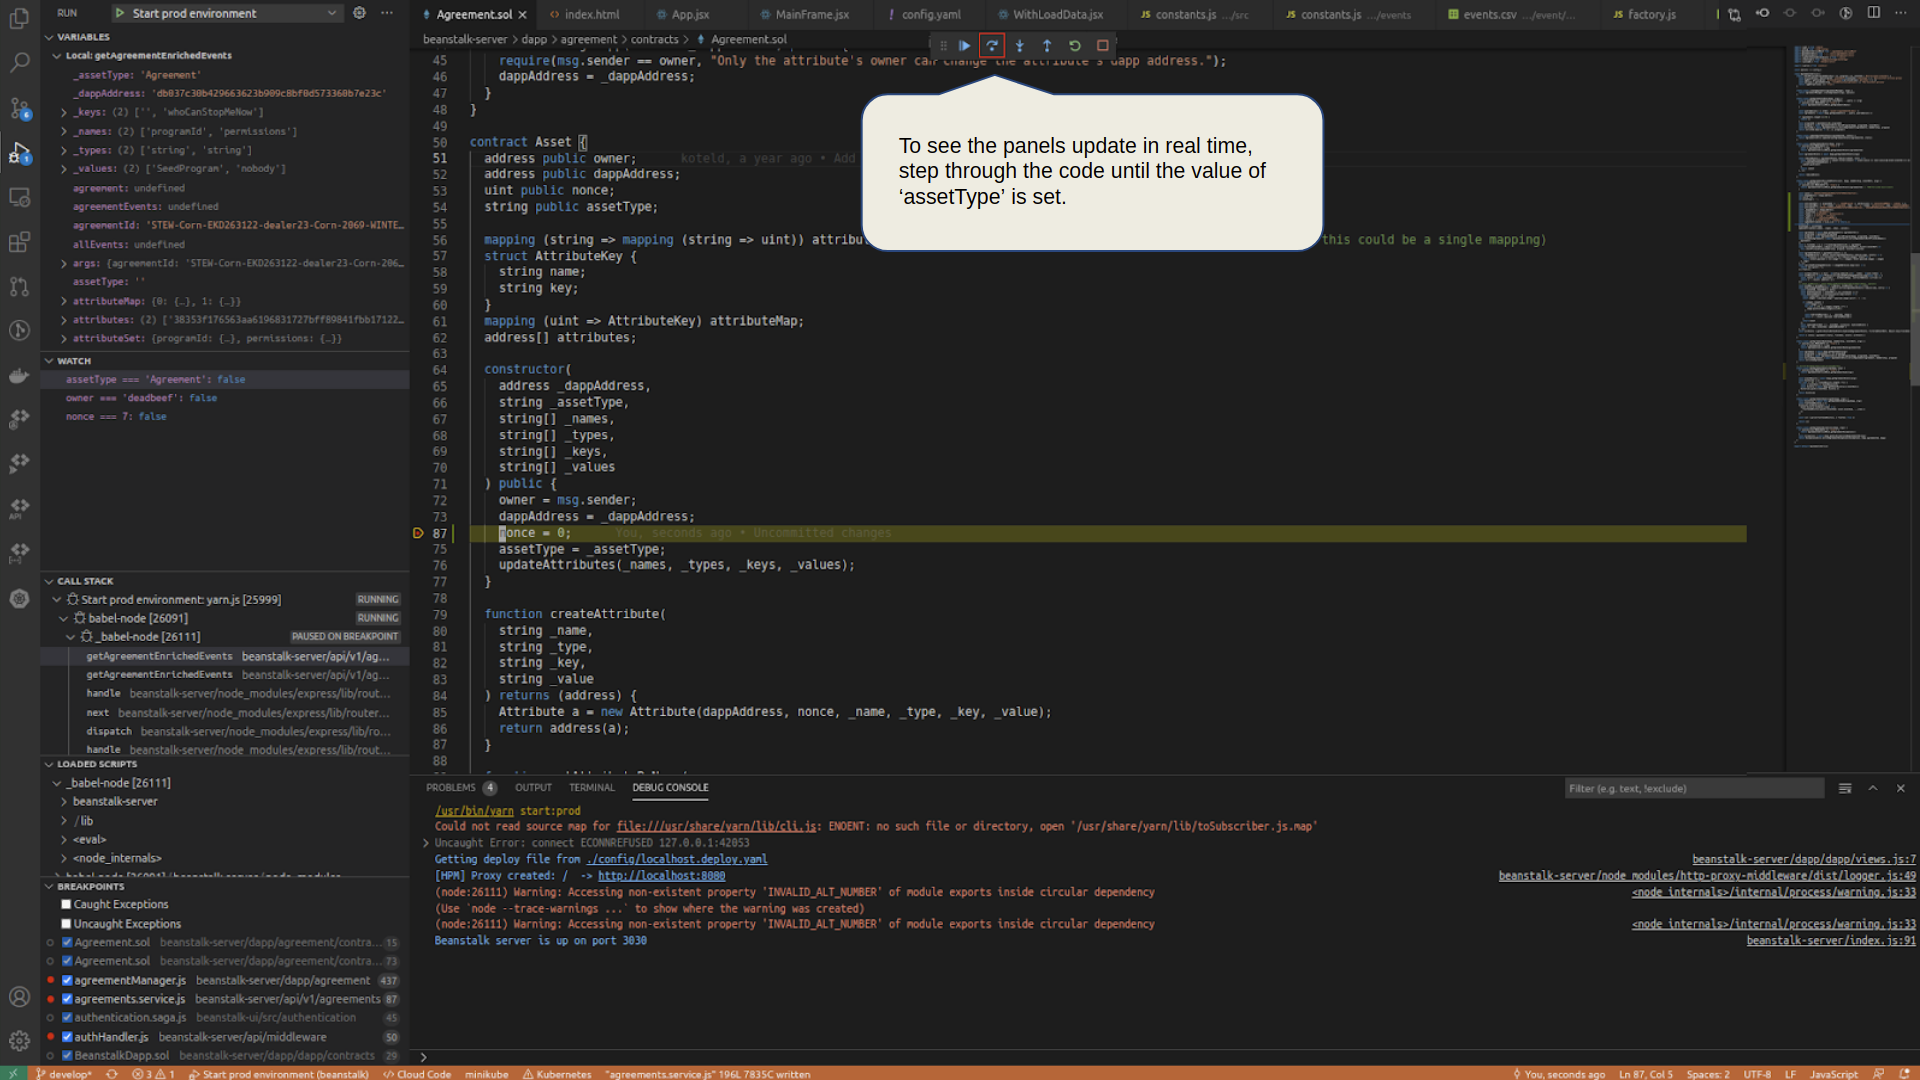
To see the panels update in real time, step through the code until the value of assetType is set.
After executing the previous statement, the smart contract execution is now paused on the statement to assign the assetType variable.
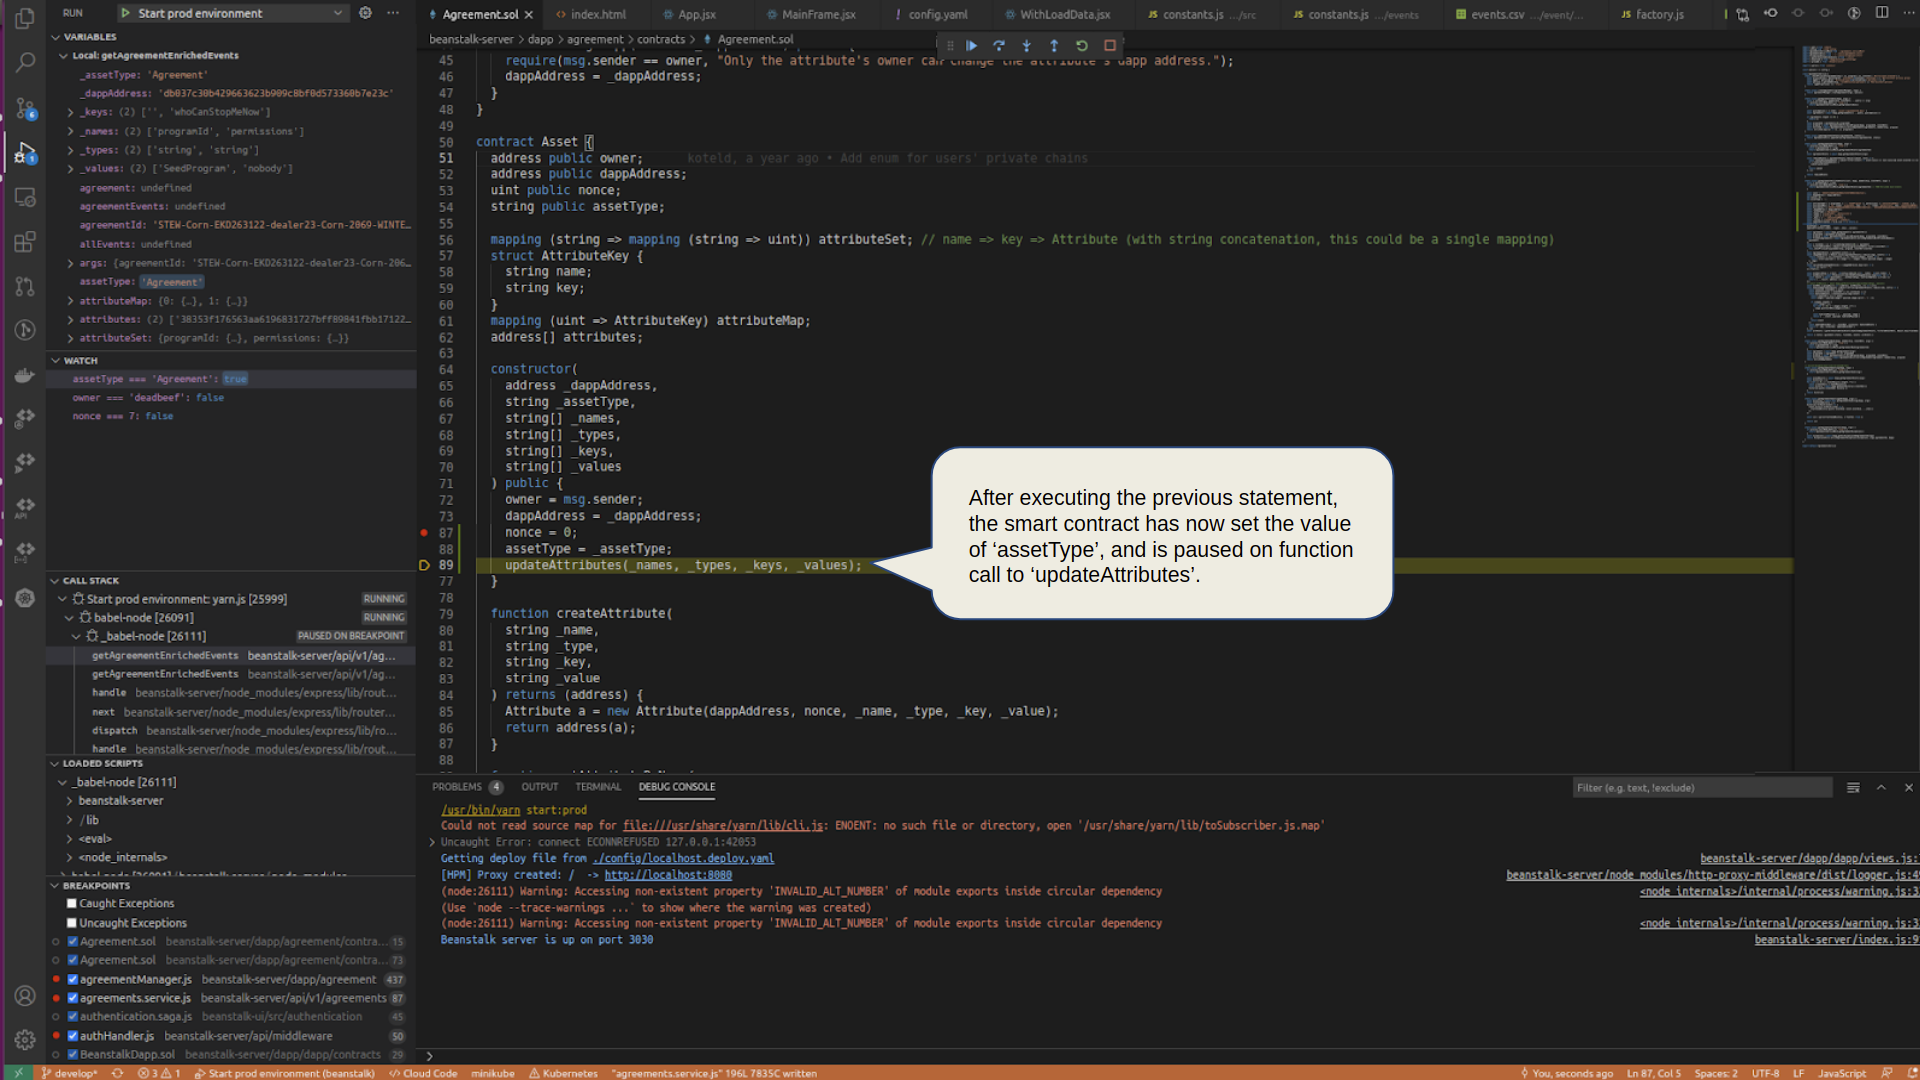
After executing the previous statement, the smart contract has now set the value of assetType, and is paused on function call to updateAttributes.
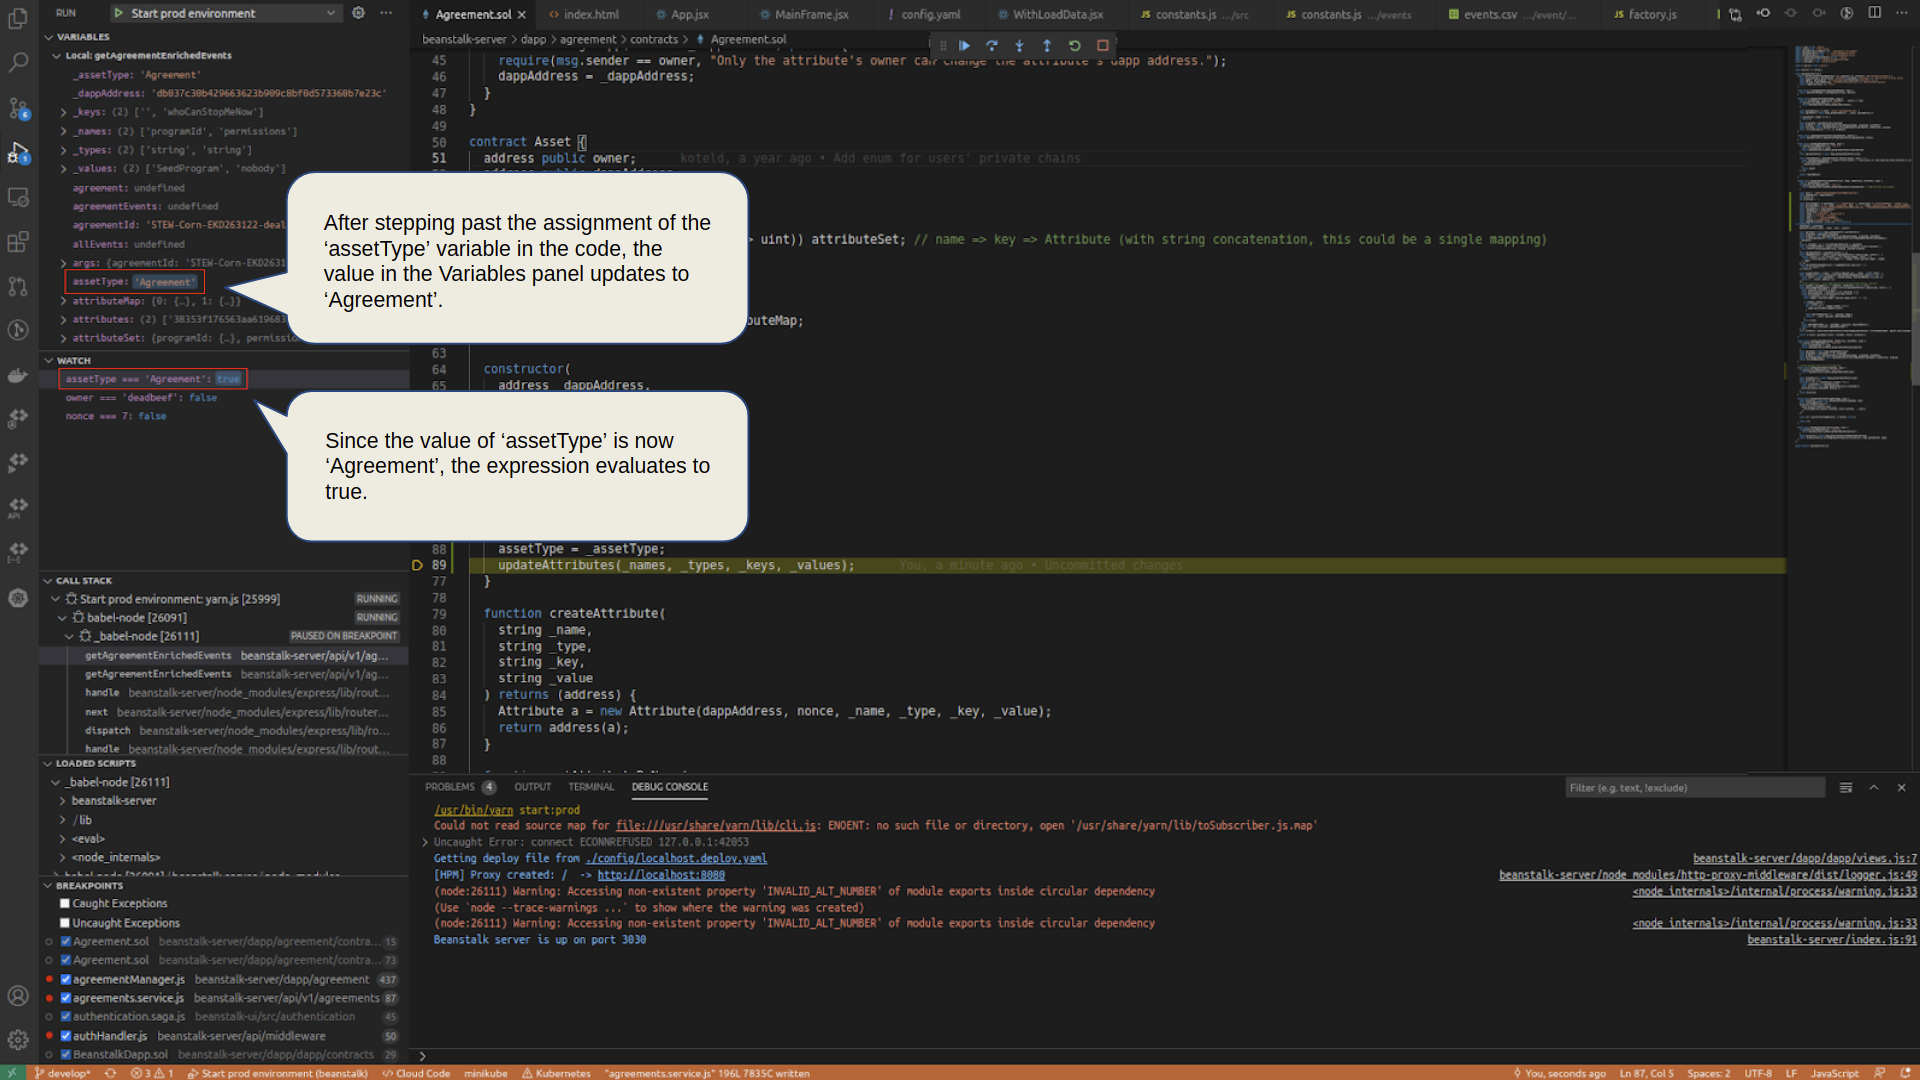
After stepping past the assignment of the assetType variable in the code, the value in the Variables panel updates to Agreement.
Since the value of assetType is now Agreement, the expression evaluates to true.
Static Code Analysis
Requirements:
- STRATO version 7.3 or greater.
The extension will automatically analyze the smart contracts (*.sol files) in the project directory for various syntax, and type errors. It uses static code analysis, which is the process of checking code for errors without actually executing the code itself.
The extension will underline warnings in yellow, and errors in red. Some common errors it detects include non-existent variables, type-mismatches, and missing semi-colons.
Simply begin writing a new smart contract to begin using the static analysis tool.
Currently, the static code analyzer detects the following issues:
| Issue Type | Severity | Example |
|---|---|---|
| Type errors | Error | contract A { |
| Incorrect version | Warning | pragma solidvm 3.1; |
| Missing inheritance constructor calls | Warning | contract A { |
| Out of scope constructor call | Warning | contract B is A { |
| Undefined constructor call | Warning | contract A { |
| Constructor call arity mismatch | Warning | contract A { |
| Boolean literal in equality condition | Warning | contract A { |
| Boolean literal outside of assignment expression | Warning | contract A { |
| Divide before multiply | Warning | contract A { |
| Pure function reading contract state | Warning | contract A { |
| Constant function modifying contract state | Warning | contract A { |
| Constant function using assembly code | Warning | contract A { |
| Missing inheritance state variable | Warning | contract A { |
| Missing inheritance function call | Warning | contract A { |
| Use of custom modifiers | Warning | contract A { |
| State variable shadowing from parent contract | Warning | contract A { |
| Uninitialized local variables | Warning | contract A { |
| Redundant writes | Warning | contract A { |
| Unused state variable | Warning | contract A { |
| Read from uninitialized state variable | Warning | contract A { |
| Constant state variables | Warning | contract A { |
Code Fuzzing/Testing
Requirements:
- STRATO version 7.3 or greater.
Code Fuzzing is the process of making automated tests on code with random input to ensure that the code works as expected for all types of cases. For the STRATO IDE, code fuzzing is implemented by writing custom test contracts. These test contracts will be used to test the real contracts of your project. This operates very similar to unit testing in standard software development. Tests are automatically run after the extension detects that you have stopped typing. You may disable this feature within the Extension Auto Fuzz Settings.
To use the code fuzzing tool, begin by writing a contract whose name is prefixed with Describe_:
contract Describe_MyTestSuite {
}
mocha or jest. Multiple contracts can be written in this manner, corresponding to multiple describe blocks. The constructor of the Describe_MyTestSuite contract acts as its beforeAll hook. The constructor cannot take any arguments.
contract Describe_MyTestSuite {
  string variableUsedByTests;
  constructor() {
    variableUsedByTests = "Hello, world!";
  }
}
Unit Tests
To create a unit test, create an external function prefixed with it_. This function must take no arguments and return a bool. A test passes when the function returns true.
contract Describe_MyTestSuite {
  string variableUsedByTests;
  constructor() {
    variableUsedByTests = "Hello, world!";
  }

  function it_CanCheckSimpleEquality() external returns (bool) {
    return variableUsedByTests == "Hello, world!";
  }
}
Test the functionality of other contracts within the current contract's scope by declaring a variable of that contract's type. Then test that contract's functionality by using its methods within the test function:
contract MyProductionContract {
  string public myProductionString;
  constructor(string x) {
    myProductionString = x;
  }
}

contract Describe_MyTestSuite {
  string variableUsedByTests;
  constructor() {
    variableUsedByTests = "Hello, world!";
  }

  function it_CanReadAStateVariable() external returns (bool) {
    MyProductionContract c = new MyProductionContract(variableUsedByTests);
    return c.myProductionString() == variableUsedByTests;
  }
}
Property Tests
Where the real power of code fuzzing comes in is the use of a property test. A property test will take one more arguments of any type and run the provided tests with 100 random inputs of those types.
To create a property test, create an external function prefixed with property_. The function must take one or more argument and return a bool. A test passes when the function returns true.
contract MyProductionContract {
  string public myProductionString;
  constructor(string x) {
    myProductionString = x;
  }
}

contract Describe_MyTestSuite {
  function property_CanReadAStateVariable(string x) external returns (bool) {
    MyProductionContract c = new MyProductionContract(x);
    return c.myProductionString() == x;
  }
}
When a test succeeds, the line on which the test function is defined will show an ellipsis underneath the "f" in function. Hovering over the function name will display the message "Test succeeded".
When a test fails, the line on which the test function is defined will be underlined with a red squiggly line with the message "Test <function name> failed with arguments <arguments>".
Customize Commands in Extension Settings
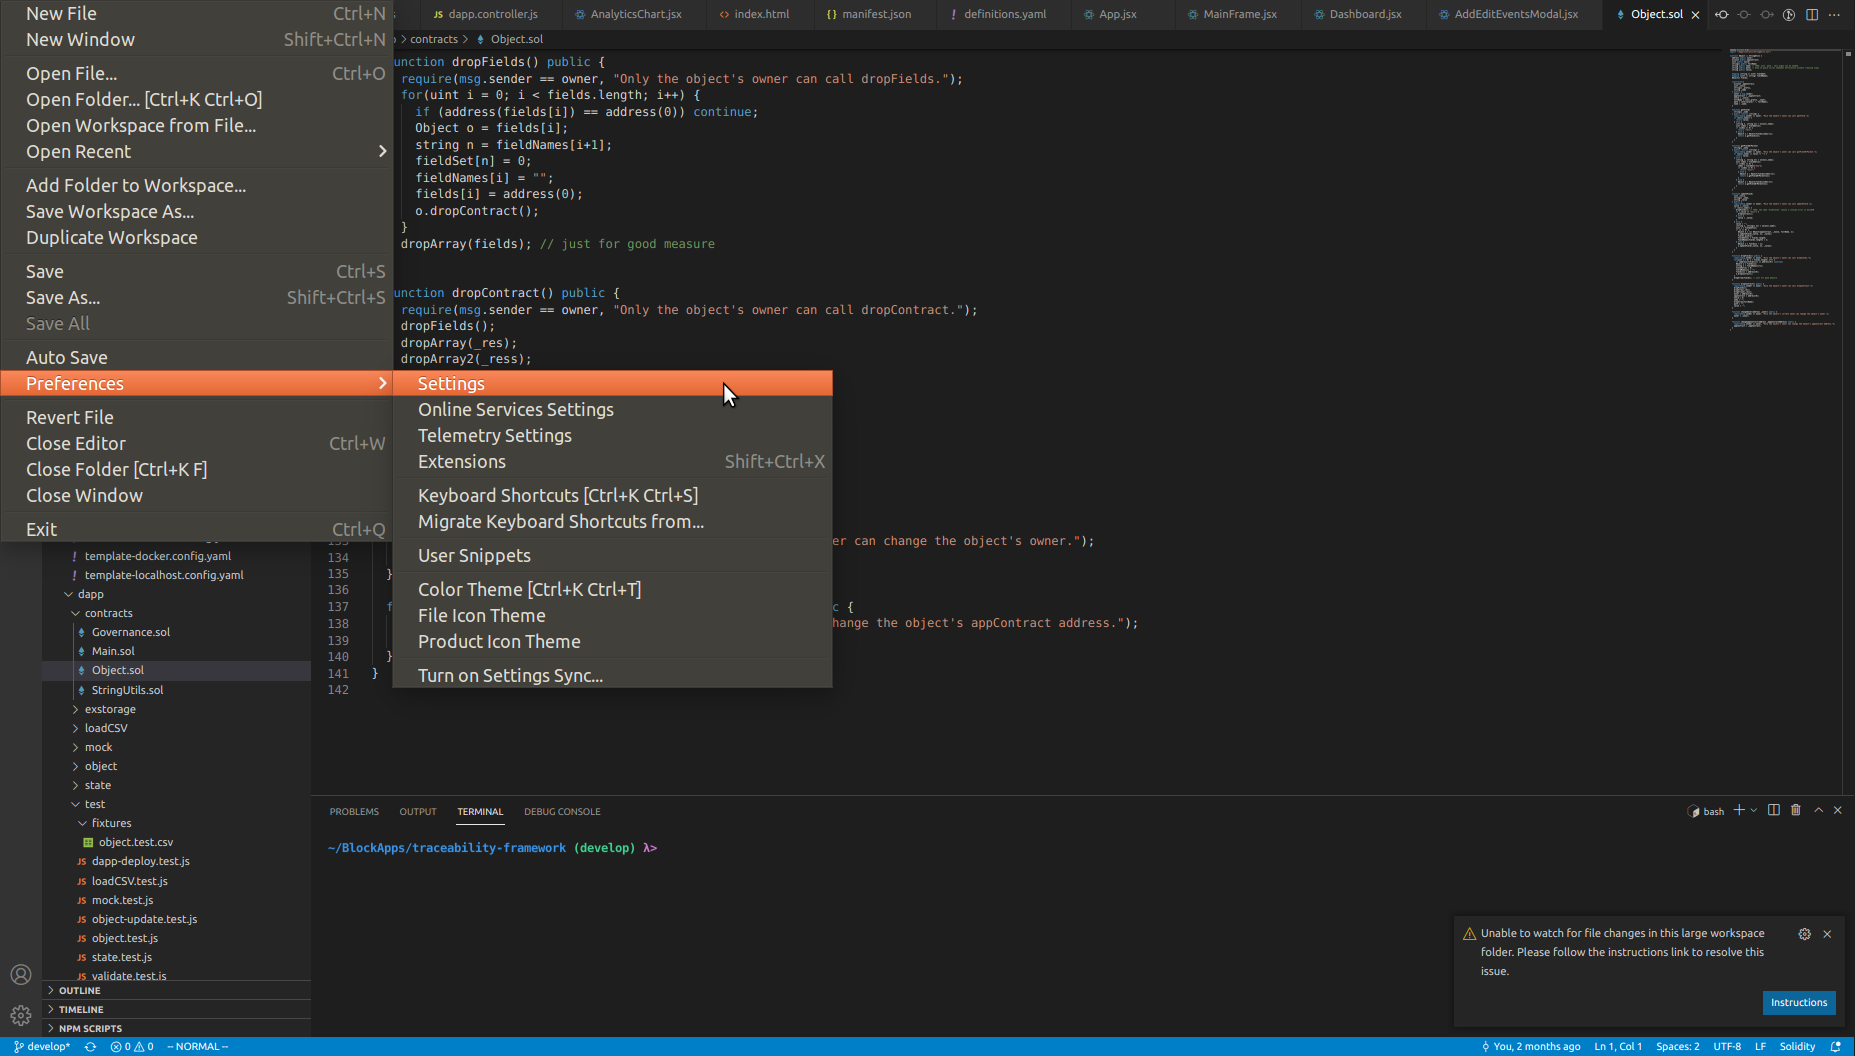
The scripts run for various commands (such as Create Project, Deploy Project, etc.) can be found and modified by clicking File -> Preferences -> Settings and then navigating to Extensions -> STRATO.
Extension Settings
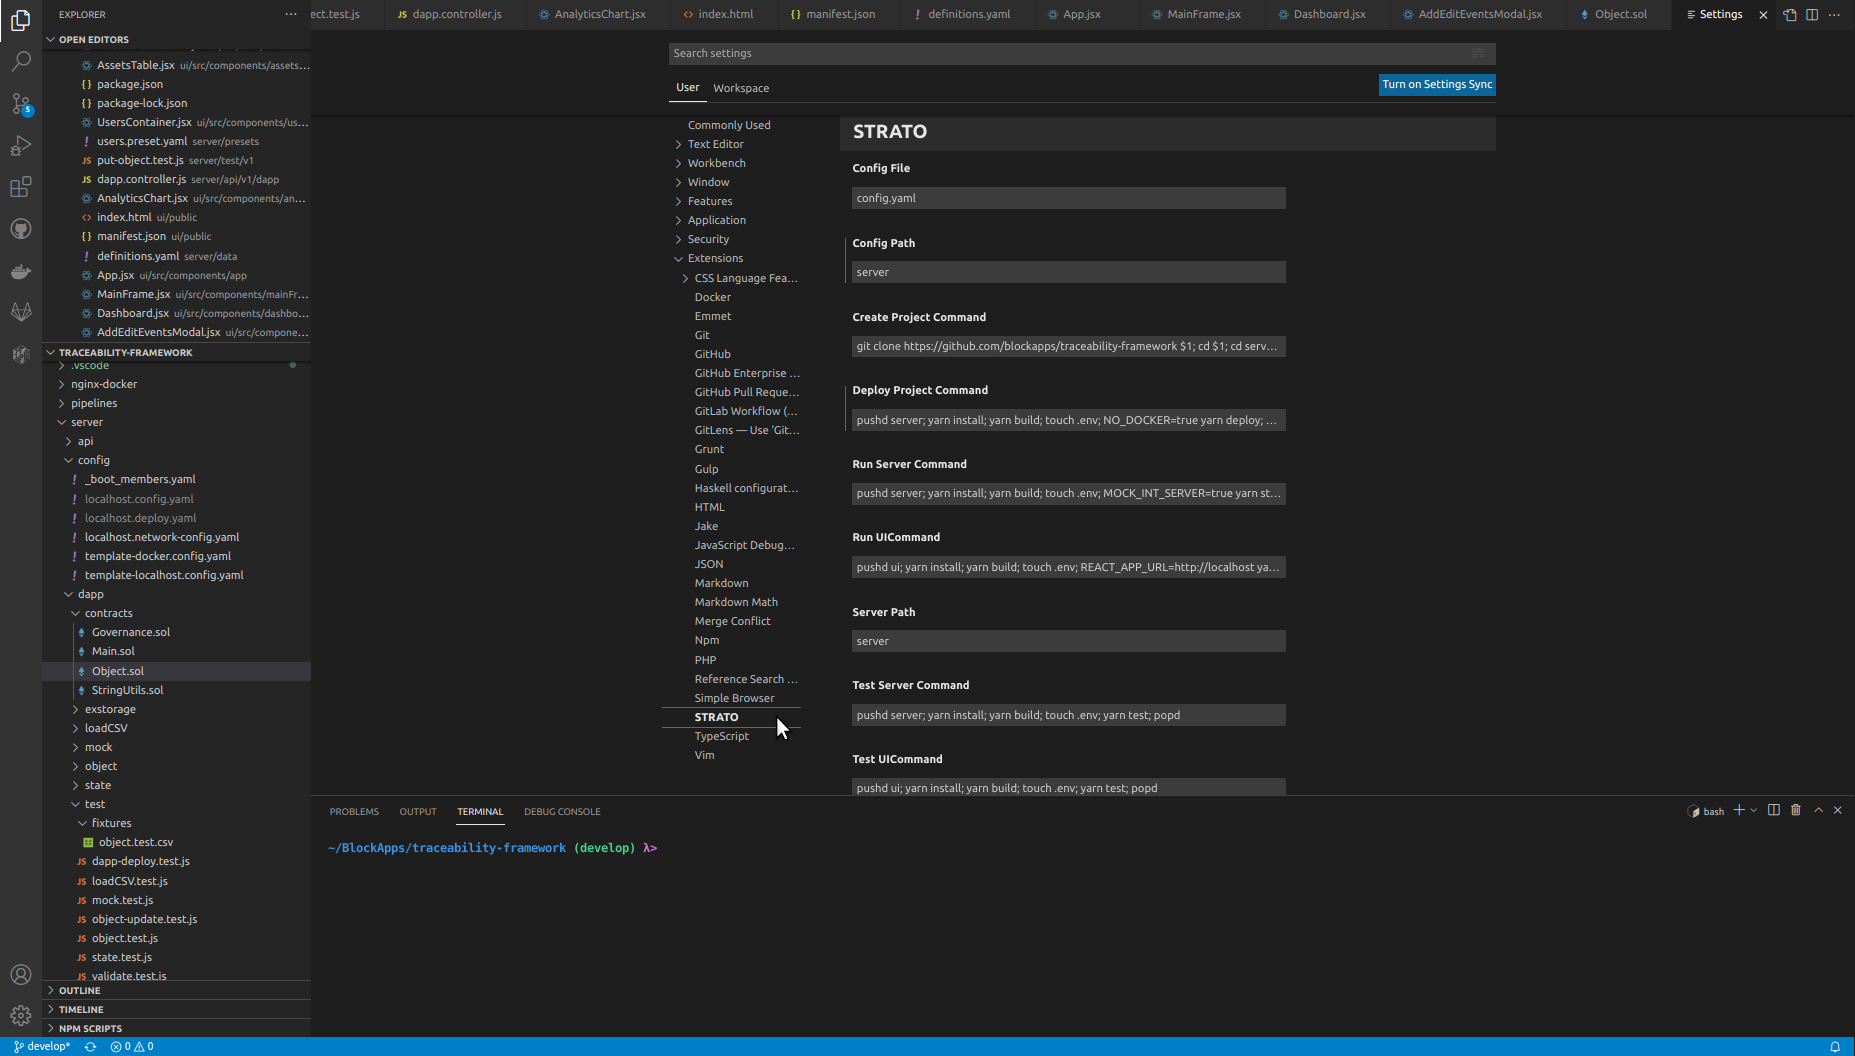
Below is an explanation of each setting for the STRATO VSCode extension. To change the settings for the STRATO VSCode extension, navigate to File > Preferences > Settings, and select Extensions > STRATO.
Auto Fuzz

The Auto Fuzz setting tells the extension whether to automatically run the SolidVM code fuzzing tool after the user stops typing. Since the tool can take a long time to complete, disabling this option may be desirable in projects with many unit and/or property tests.
Config File

The Config File setting is the filename of the YAML file used to store the current project's configuration. The YAML file includes information such as a list of node URLs, OAuth credentials, and project preferences. Most of the STRATO extension's functionality depends on this value being set correctly. Typically, the project's YAML configuration is stored at "server/config.yaml", so the Config File setting should be "config.yaml".
Config Path

The Config Path setting is the directory path of the YAML file used to store the current project's configuration. The YAML file includes information such as a list of node URLs, OAuth credentials, and project preferences. Most of the STRATO extension's functionality depends on this value being set correctly. Typically, the project's YAML configuration is stored at "server/config.yaml", so the Config Path setting should be "server". The extension automatically adds the "/" between "server" and "config.yaml" when creating the full filepath of the config file.
Create Project Command

The Create Project Command setting is a shell script that is responsible for cloning and installing a new project in a given directory. The script takes a single parameter, a directory path, which can be accessed using "$1" in the script. The directory path is entered by the user when creating a new project, along with a test node URL and production node URL. By default, the script clones the traceability-framework repo from BlockApps' GitHub, and installs both the server and ui projects from yarn.
Default
git clone https://github.com/blockapps/traceability-framework $1
cd $1
cd server
yarn install
yarn build
cd ../ui
yarn install
yarn build
cd ..
Deploy Project Command

The Deploy Project Command setting is a shell script that is responsible for deploying a new instance of a project to a running STRATO network. The script takes no parameters.
Default
pushd server
yarn install
yarn build
touch .env
yarn deploy
popd
Run Server Command

The Run Server Command setting is a shell script that is responsible for running an instance of the project's server, connected to a running STRATO network. The script takes no parameters.
Default
pushd server
yarn install
yarn build
touch .env
MOCK_INT_SERVER=true yarn start:prod
popd
Run UI Command

The Run Server Command setting is a shell script that is responsible for running an instance of the project's UI, connected to a running STRATO network. The script takes no parameters.
Server Path

The Server Path setting is the path to the directory containing the project's server code. This setting is used by the test tools to combine Solidity files together to send to STRATO.
Test Server Command

The Test Server Command setting is a shell script that is responsible for running project's server test suite. The script takes no parameters.
Default
pushd server
yarn install
yarn build
touch .env
yarn test
popd
Test UI Command

The Test UI Command setting is a shell script that is responsible for running project's UI test suite. The script takes no parameters.
Troubleshooting
I pressed step in/over/out while debugging, and the debugger appears to have resumed execution unexpectedly.
Try pressing the pause button in the debugger control panel again.
I have configured my extension correctly, but I am still not able to connect to my node.
Check to make sure that the OAuth configuration in your config.yaml file matches the OAuth configuration used when starting the node.